Introduction
In the intricate world of web application security, “force Browse” stands as a fundamental technique for uncovering hidden vulnerabilities. It’s the art of systematically guessing or predicting URLs, directories, and files that might not be directly linked from the application’s interface but are still accessible. This often overlooked attack vector can expose sensitive information, administrative panels, or even critical configuration files, paving the way for more severe breaches.
This blog post will delve into the practical aspects of mastering force Browse, equipping you with the knowledge and tools to effectively identify these hidden gems. We’ll specifically focus on leveraging OWASP ZAP, a powerful and open-source web security scanner, to automate and streamline your force Browse efforts. By understanding how to properly configure and utilize ZAP’s capabilities, you can significantly enhance your web application penetration testing methodology.
Before we dive into the how-to, it’s crucial to understand the nuances of the different force browse options available in tools like OWASP ZAP, as choosing the right one can significantly impact the effectiveness and scope of your testing. We’ll cover:
- Force Browse Site: This option attempts to discover content across the entire domain, effectively starting from the root of the web application. It’s a broad approach, ideal for initial reconnaissance when the structure of the site is largely unknown.
- Force Browse Directory: This more focused approach concentrates on a specific directory and attempts to enumerate files and subdirectories within that particular path. It’s useful when you’ve identified a specific area of interest and want to thoroughly explore its contents.
- Force Browse Directory (and Children): This is an extension of force Browse a directory. Not only does it attempt to discover content within the specified directory, but it also recursively explores all subdirectories found within it. This comprehensive option is perfect for deep dives into a known section of the application where you suspect multiple layers of hidden content might exist.
How to Use Force Browse Directory in OWASP ZAP (Step-by-Step Guide)
Using Force Browse in OWASP ZAP is straightforward, yet powerful. Here’s a step-by-step guide:
1. Prerequisites:
- Ensure OWASP ZAP is running.
- The target web application should be in ZAP’s “Sites” tree and ideally within your defined scope. You can add a site to the scope by right-clicking it in the Sites tree and selecting “Include in Scope.”
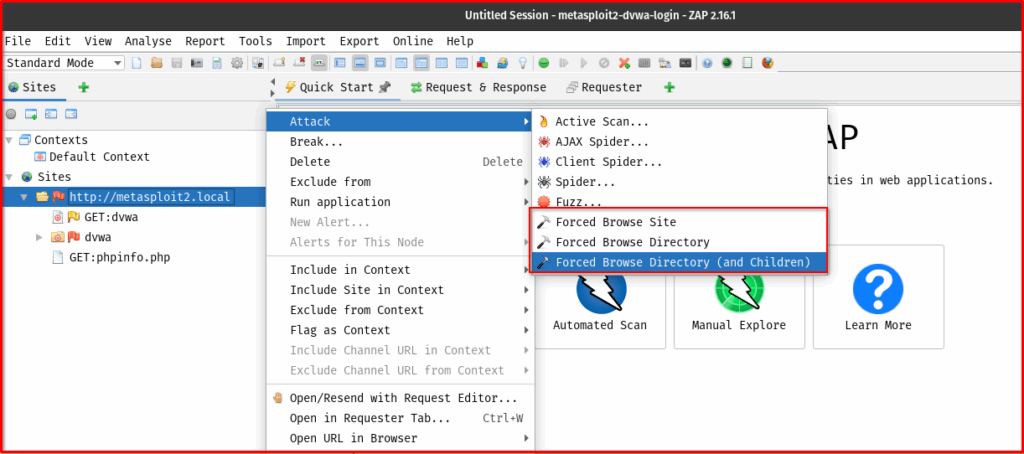
2. Accessing the Feature: There are a couple of ways to initiate a Force Browse scan:
- Via the Sites Tree (Recommended): This is often more convenient. Right-click on the specific target URL or a branch of the site in the “Sites” tree that you wish to force browse. Then, navigate to
Attack->Force Browse Directory.
3. Configuration Options: Once you open the Force Browse dialog, you’ll see several important configuration options:
- Target URL/Scope: This field will automatically populate if you initiated the scan from the Sites tree. You can manually adjust the base URL or select a specific path within the application to focus your scan.
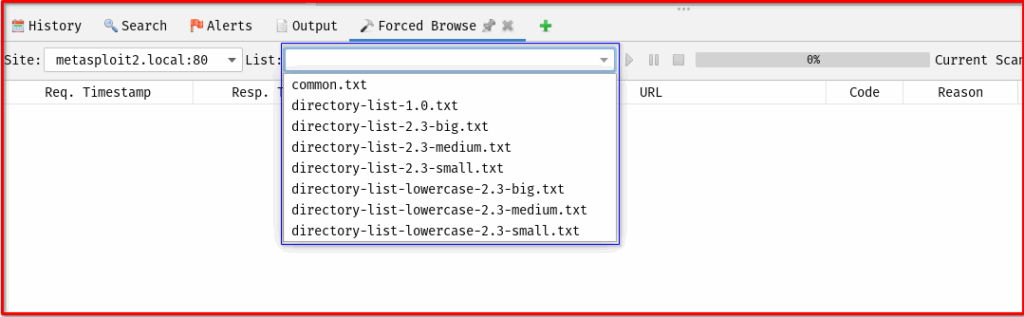
- Wordlists: This is the heart of Force Browse.
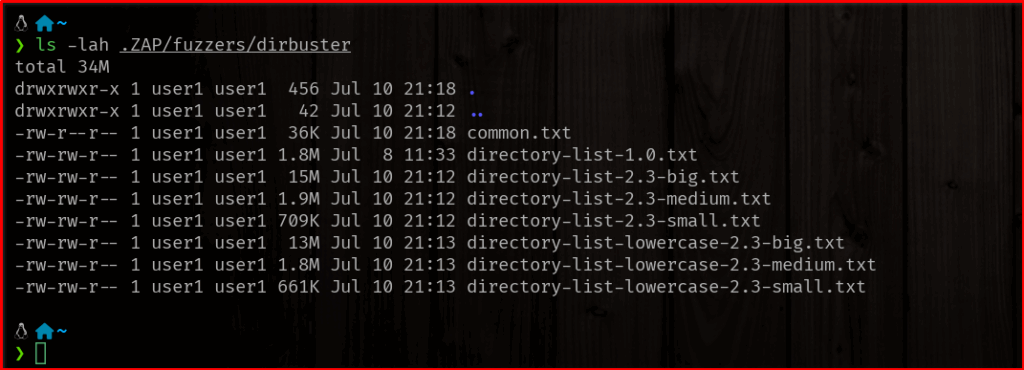
- ZAP comes with several default wordlists, often located in
ZAP_HOME/wordlists/dirbuster/. Common ones includedirectory-list-2.3-medium.txtordirectory-list-2.3-small.txt. - You can load custom wordlists by clicking the “Add” button and browsing to your
.txtfile. Custom wordlists are crucial for targeting specific technologies or application types. - Tip: Choose wordlists relevant to your target. A general wordlist is good for initial discovery, but a wordlist tailored for, say, WordPress or Apache, will be more effective if you know the underlying technology. Restart your OWASP ZAP after adding new wordlist to these directory below. (I don’t in Windows and MacOS default wordlists location)
- ZAP comes with several default wordlists, often located in
- Threads: This controls the number of concurrent requests ZAP will send. Increasing threads speeds up the scan but can put more load on the target server. Be mindful of the target’s capacity to avoid a Denial of Service (DoS) or getting your IP blocked. Start with a lower number (e.g., 5-10) and increase cautiously.
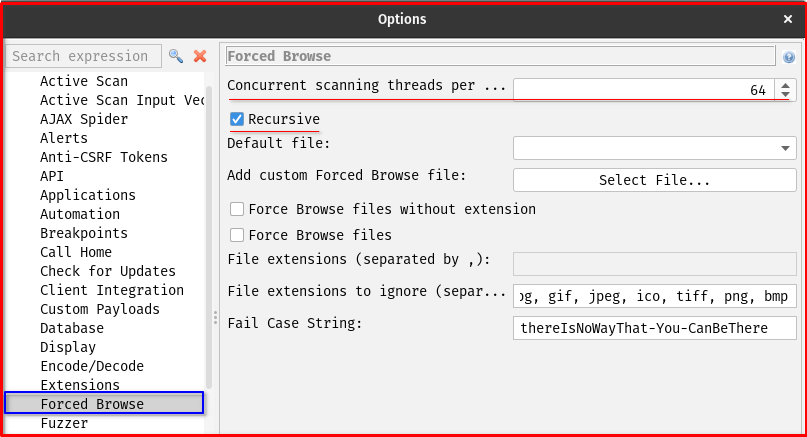
- Recursive Scan: If checked, ZAP will attempt to force browse subdirectories discovered during the scan. For example, if it finds
/admin/, it will then try/admin/login,/admin/config, etc., based on the wordlist. This significantly increases the scan depth and time but can yield more results. - HTTP Methods: Typically,
GETandHEADmethods are used for force browsing.HEADrequests are faster as they only retrieve headers, butGETensures you can see the actual content if a directory listing is enabled or a file is found. - Status Codes: ZAP will interpret successful responses (e.g., 200 OK, 301 Moved Permanently, 302 Found) as indicators that a directory or file exists. You can configure which status codes ZAP should consider “found.”
4. Running the Scan:
- Once your configurations are set, click the “Start Scan” button.

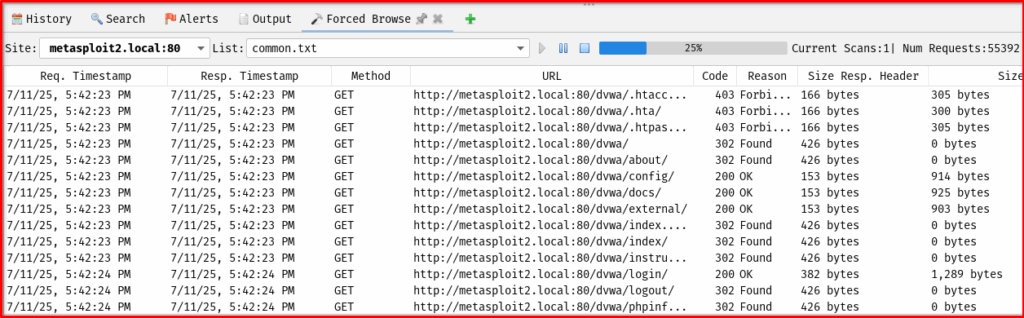
- You can monitor the progress in the “Force Browse” tab at the bottom of ZAP’s interface (if you initiated it from the Sites tree). ZAP will show you the URLs being tested and the responses received.
5. Analyzing Results:
- As ZAP discovers new directories or files, they will be added to the “Sites” tree on the left-hand side. Look for new entries under your target domain.
- Right-click on any discovered directory or file in the Sites tree and select “Open URL in Browser” to inspect its content manually.
- In the “History” tab, you can review all the requests and responses made by the Force Browse feature. Pay close attention to responses that return 200 OK, especially if the content looks unusual or sensitive.
- Be aware of “soft 404s” – custom error pages that return a 200 OK status code. ZAP might mark these as “found,” but manual inspection is necessary to confirm if it’s a legitimate resource or just an error page.
Best Practices and Considerations
To make your force browsing efforts effective and ethical, keep these best practices in mind:
- Permissions are Paramount: Always obtain explicit, written permission from the asset owner before performing any form of security testing, including force browsing, on systems you do not own or are not authorized to test. Unauthorized scanning can be illegal and harmful.
- Define a Narrow Scope: While tempting to scan everything, define a narrow and precise scope for your force browse. This prevents overwhelming the target server, reduces unnecessary traffic, and keeps your results focused.
- Strategic Wordlist Selection: The quality of your wordlists directly impacts the effectiveness of your scan. Use:
- General wordlists: For common paths and files.
- Technology-specific wordlists: If you know the underlying technologies (e.g., Apache, Nginx, specific CMS like WordPress, Joomla, etc.).
- Custom wordlists: Create your own based on information gathered during passive reconnaissance (e.g., company naming conventions, known application components).
- Mind the Rate Limiting/Throttling: Force browsing generates a lot of requests in a short period. Be mindful of the target server’s capacity and any rate-limiting mechanisms it might have in place. Adjust the number of threads in ZAP to avoid a Denial of Service (DoS) or getting your IP blocked.
- Beware of False Positives and Negatives:
- False Positives: As mentioned, custom 404 pages that return a 200 OK status code can be misleading. Always manually verify discovered paths.
- False Negatives: Force browsing is only as good as its wordlist. If a hidden path isn’t in your wordlist, ZAP won’t find it. This is why combining it with other techniques is crucial.
- Combine with Other Tools and Techniques: Force Browse is most powerful when used in conjunction with other reconnaissance methods:
- Spidering: To map the visible application.
- Manual Exploration: Browsing the application yourself to understand its structure and identify potential naming conventions.
- OSINT (Open Source Intelligence): Gathering information about the target from public sources.
- Vulnerability Scanning: Once hidden resources are found, they can be subjected to further vulnerability analysis.
Final Thoughts
Force Browse, while seemingly straightforward, is a critical component of a comprehensive web application security assessment. It highlights the importance of robust access control mechanisms and the dangers of relying on “security through obscurity.” As we’ve explored, tools like OWASP ZAP empower security professionals to systematically uncover hidden resources that could otherwise be missed, providing invaluable insights into an application’s attack surface.
However, with great power comes great responsibility. The ethical implications of force Browse cannot be overstated. Always ensure you have explicit authorization before conducting any form of penetration testing, and operate within clearly defined scopes. Remember that the goal is to identify and remediate vulnerabilities, not to cause harm. By combining technical proficiency with ethical considerations and a commitment to continuous learning, you can effectively master force Browse and contribute to building a more secure digital landscape.