Introduction
If you’re running Openbox as your window manager, you’ve likely chosen it for its lightweight nature and extensive customization options. One of the first things you’ll want to configure is quick and easy access to your terminal emulator. Whether you’re a developer, system administrator, or power user, having your preferred terminal readily available is essential for a smooth workflow.
In this tutorial, we’ll explore several methods to set up your default terminal in Openbox, from environment variables to keyboard shortcuts and menu configurations. Each approach has its own advantages, so you can choose the one that best fits your workflow preferences.
How to setup a default terminal
Method 1: Set the TERMINAL environment variable
Add this line to your ~/.profile or ~/.bashrc:
export TERMINAL="your-terminal-name"
Replace your-terminal-name with your preferred terminal (e.g., xterm, urxvt, terminator, gnome-terminal, etc.).
Method 2: Configure keyboard shortcuts in Openbox
Edit your Openbox configuration file ~/.config/openbox/rc.xml and add a keyboard binding in the <keyboard> section:
<keybind key="C-A-t">
  <action name="Execute">
    <command>your-terminal-name</command>
  </action>
</keybind>
This example binds Ctrl+Alt+T to open your terminal. You can change the key combination as needed.
Edit ~/.config/openbox/menu.xml and add a terminal entry:
<item label="Terminal">
  <action name="Execute">
    <command>your-terminal-name</command>
  </action>
</item>
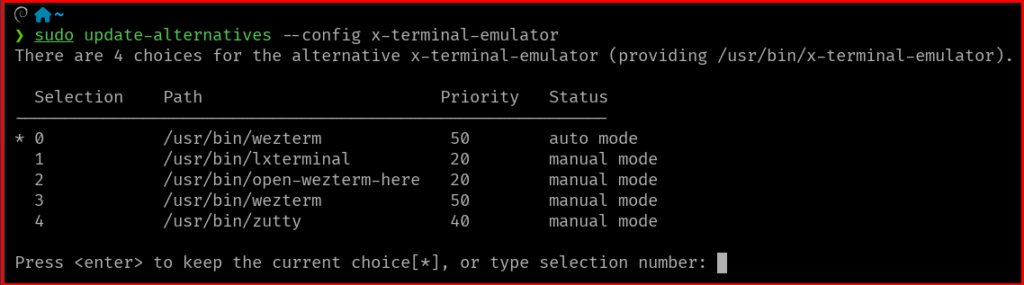
Method 4: Use update-alternatives (Debian/Ubuntu systems)
If you’re on a Debian-based system, you can set the system-wide default terminal:
sudo update-alternatives --install /usr/bin/x-terminal-emulator x-terminal-emulator /usr/bin/your-terminal-name 50
sudo update-alternatives --config x-terminal-emulator
After making changes to Openbox configuration files, reload the configuration with:
openbox --reconfigure
The most common approach is using Method 2 for keyboard shortcuts, as it gives you quick access to your terminal from anywhere in your Openbox session.
Final Thoughts
Setting up your default terminal in Openbox is a fundamental step in creating an efficient desktop environment. The beauty of Openbox lies in its flexibility – you’re not locked into any single approach. Many users combine multiple methods, such as setting up both keyboard shortcuts and menu entries, to ensure their terminal is always just a keystroke or click away.
Remember that Openbox’s lightweight nature means you have full control over your desktop experience. Take time to experiment with different terminal emulators and find the one that suits your needs best, whether that’s the simplicity of xterm, the features of urxvt, or the modern capabilities of Alacritty or kitty.
As you continue customizing your Openbox setup, consider documenting your configurations. This not only helps you remember your choices but also makes it easier to replicate your setup on other systems. Happy customizing!