🔒 Securing Your Home Network: Encrypted DNS with OPNsense
In today’s digital world, privacy and security are more important than ever. While we often think about encrypting web traffic with HTTPS, one of the most fundamental parts of the internet—the Domain Name System (DNS)—is often left exposed. By default, your DNS queries are sent in plaintext, meaning your Internet Service Provider (ISP) and anyone else on the network can see every website you visit.
This is where DNS-over-TLS (DoT) and DNS-over-HTTPS (DoH) come in. These protocols encrypt your DNS traffic, preventing snooping and ensuring your browsing activity remains private. With your OPNsense firewall and its built-in Unbound DNS service, you have a powerful tool to enable this on your entire home network.
What’s the Difference? DoT vs. DoH
Both DoT and DoH achieve the same goal: to encrypt your DNS queries. However, they do it differently.
- DNS-over-TLS (DoT): This protocol uses a dedicated port (TCP port 853) to establish a secure, encrypted connection for DNS queries. It’s a straightforward approach that keeps DNS traffic separate from other web traffic. Think of it as a private, secure lane specifically for your DNS requests.
- DNS-over-HTTPS (DoH): This protocol wraps DNS queries inside the standard HTTPS protocol, using the same port (TCP port 443) that your web browser uses for secure browsing. From a network perspective, DoH traffic looks just like regular web traffic. This can be an advantage in restrictive networks that might block DoT’s dedicated port, as it “camouflages” your DNS queries.
Choosing Your Encrypted DNS Provider
To use encrypted DNS, you need a public resolver that supports either DoT or DoH. You can’t use both simultaneously for the same traffic, so you’ll have to choose one or the other. Here are several popular and reliable choices, each with its own focus:
Cloudflare DNS (Tested Working fine in port 853)
Cloudflare offers services with and without security filtering.
- Standard (No filtering):
- IPv4:
1.1.1.1and1.0.0.1 - IPv6:
2606:4700:4700::1111and2606:4700:4700::1001
- IPv4:
- Malware Blocking Only:
- IPv4:
1.1.1.2and1.0.0.2 - IPv6:
2606:4700:4700::1112and2606:4700:4700::1002
- IPv4:
- Malware & Adult Content Blocking (Cloudflare for Families):
- IPv4:
1.1.1.3and1.0.0.3 - IPv6:
2606:4700:4700::1113and2606:4700:4700::1003
- IPv4:
OpenDNS (Tested Working fine in port 853)
OpenDNS also provides a few different tiers, with the FamilyShield service being very popular for home use.
- OpenDNS Home (Standard filtering, no parental controls):
- IPv4:
208.67.222.222and208.67.220.220 - IPv6:
2620:119:35::35and2620:119:53::53
- IPv4:
- FamilyShield (Includes standard filtering + adult content blocking):
- IPv4:
208.67.222.123and208.67.220.123 - IPv6:
2620:119:35::123and2620:119:53::123
- IPv4:
Quad9 (Tested Working fine in port 853)
Quad9 is well-known for its security focus. Their primary service includes malware and phishing protection.
- Secure (Malware blocking, DNSSEC validation):
- IPv4:
9.9.9.9and149.112.112.112 - IPv6:
2620:fe::feand2620:fe::9
- IPv4:
- Secure w/ ECS (Includes security + EDNS Client Subnet support for content delivery):
- IPv4:
9.9.9.11and149.112.112.11 - IPv6:
2620:fe::11and2620:fe::fe:11
- IPv4:
- Unsecured (No security filtering or DNSSEC):
- IPv4:
9.9.9.10and149.112.112.10 - IPv6:
2620:fe::10and2620:fe::fe:10
- IPv4:
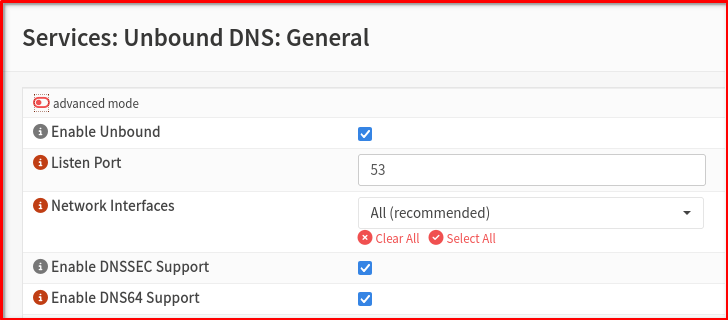
You’ll need to configure Unbound DNS on your OPNsense firewall to forward all client DNS queries to your chosen provider’s DoT or DoH address. This process is typically found under Services > Unbound DNS > General It should be enable and listen to port 53 by Default
To the upstream 3rd party encrypted DNS provider go to Services > Unbound DNS > DNS over TLS then click ADD for example I use cloudflare with these settings.

Verify from your Guest VM/OS that using OPNsense LAN and visit the site https://browserleaks.com/dns
Note: I recommend this as the most reliable, neutral tool for testing proper DNS configuration.
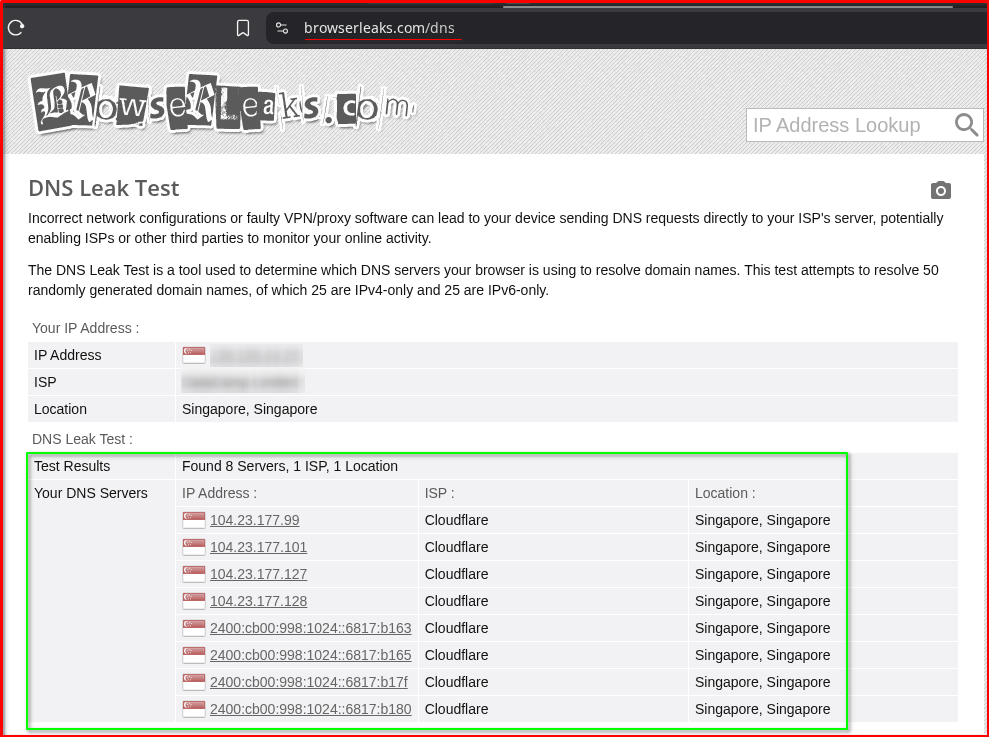
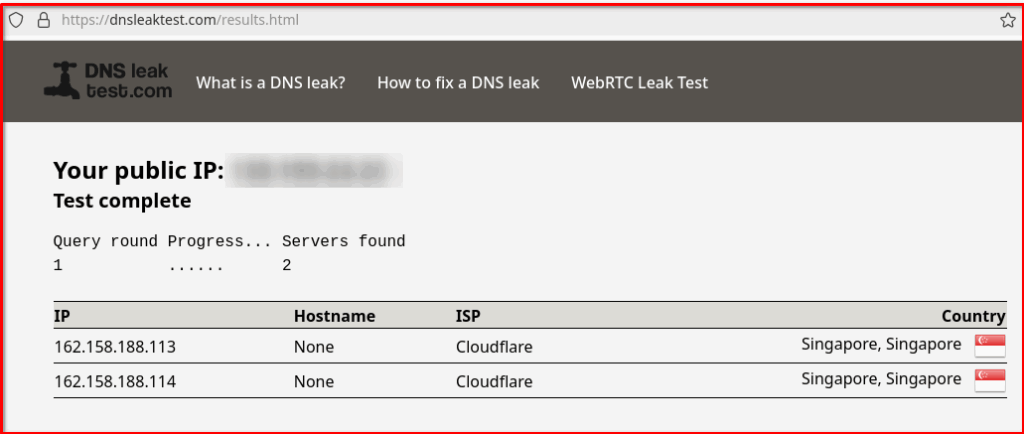
Verify from other site https://dnsleaktest.com
Troubleshooting: How to Resolve DNS Settings Conflicts
Note: This section can be skipped if DNS has not been previously configured in OPNsense
This is a very common point of confusion for OPNsense users, and it’s a critical step in the setup process. Let’s break down why this is so important and how to handle it.
Why Conflicts Occur
OPNsense has multiple places where DNS servers can be configured, and they can conflict with each other. Here are the main areas to consider:
- System > Settings > General: This page has a list of DNS servers. By default, your ISP’s DNS servers are often added here via DHCP on the WAN interface. OPNsense’s internal services will use these servers for its own lookups (e.g., for firmware updates, plugins, etc.).
- Services > Unbound DNS > General: This is the core DNS resolver service. When enabled, it listens on port 53 and handles DNS queries for your local network. It can be configured to either be a “recursive” resolver (doing the work itself) or a “forwarder” (sending requests to another server).
- Services > Unbound DNS > DNS over TLS/HTTPS: This is where you specifically configure Unbound to forward queries to an encrypted provider.
- DHCP Server: The DHCP service on your LAN interface tells all the devices on your network which DNS server to use.
The conflict happens when the firewall itself or a device on your network is told to use multiple, different DNS servers. For example, if you configure Unbound to use Cloudflare DoT, but your WAN interface is still getting your ISP’s DNS from DHCP, the OPNsense firewall might still use the ISP’s DNS for its own lookups, bypassing your DoT configuration.
How to Avoid Conflict: The Best Practice
To ensure all DNS traffic is encrypted and handled by Unbound, you need to follow a specific order of operations. The goal is to make Unbound DNS the only DNS authority for everything on your network, including the firewall itself.
⚠️ A Crucial Step: Preventing DNS Conflicts in OPNsense
After you’ve chosen your encrypted DNS provider, there’s one more critical step to ensure your setup works perfectly: you must prevent DNS conflicts. On OPNsense, it’s easy for different DNS settings to compete, leading to unexpected behavior and a false sense of security.
The goal is simple: force all DNS queries, both from your local network clients and from the OPNsense firewall itself, to go through your newly configured Unbound DNS service.
The Three Key Changes You Need to Make
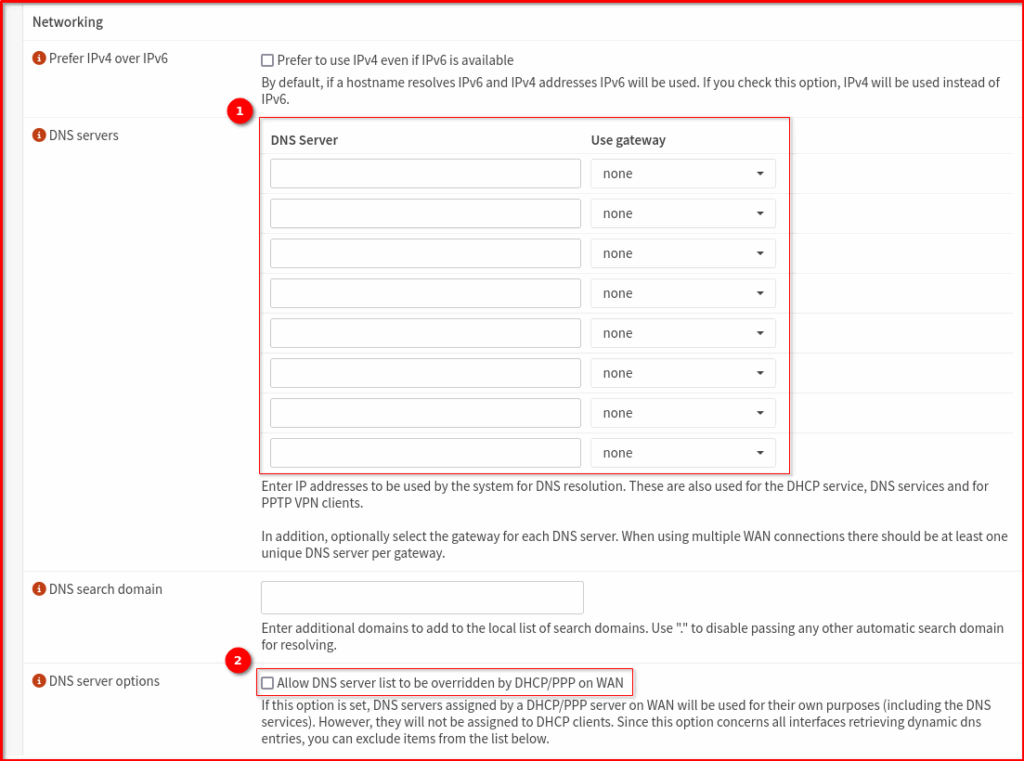
- Clear the Main DNS Server List: Navigate to System > Settings > General. You will likely see DNS servers listed here, either manually entered or automatically provided by your ISP via DHCP on the WAN interface. Remove all of these entries. This ensures the firewall doesn’t bypass Unbound for its own queries.
- Disable “Allow DNS server list to be overridden…”: On that same System > Settings > General page, make sure the box for “Allow DNS server list to be overridden by DHCP/PPP on WAN” is unchecked. This prevents your firewall from automatically learning and using your ISP’s DNS servers.
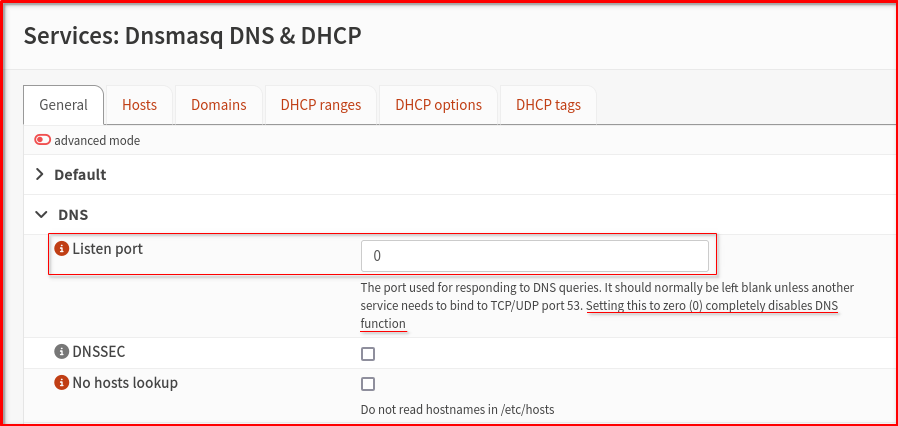
- Ensure DHCP Points to Unbound: Go to Services > Dnsmasq DNS & DHCP > General. Set ‘Listen port’ to zero. This tells clients to use port 53, where OPNsense Unbound service runs on the firewall. All DNS queries go through this service and get forwarded securely via DoT or DoH
Why This Works
By following these steps, you create a “single point of truth” for all DNS queries:
- For your LAN clients: Their DNS queries go to your OPNsense firewall’s LAN IP address.
- For the OPNsense firewall itself: By clearing the general DNS list, you’re telling the firewall to use its own internal DNS resolver—which is your Unbound service.
All of these queries now land in the lap of Unbound, which is configured to forward them exclusively to your chosen DoT or DoH provider. This ensures a consistent, secure, and encrypted DNS pipeline for every device on your network.
Pro-Tip: After making these changes, it’s a good practice to reboot your firewall and renew the DHCP lease on a client device to ensure all settings take effect immediately.
Advantages of Encrypted DNS on OPNsense
Enabling encrypted DNS on your OPNsense firewall offers several key advantages for your entire network:
- Enhanced Privacy: This is the biggest benefit. Your ISP and other third parties can no longer see which websites you visit. This protects your personal browsing history from being monitored or sold.
- Increased Security: Encrypted DNS prevents DNS spoofing and other man-in-the-middle attacks where an attacker could redirect you to a malicious website. It ensures that the DNS query and response you receive are authentic and haven’t been tampered with.
- Bypassing Censorship: In some cases, encrypted DNS can help bypass basic DNS-based censorship or geo-restrictions, as your requests are not in plain text and are not being resolved by a local, potentially restrictive, DNS server.
- Centralized Control: Instead of configuring DoT/DoH on every single device (which is often difficult or impossible), you can enable it once on your OPNsense firewall. This forces all devices on your network to use the secure, encrypted DNS, providing a consistent level of protection.
Minor Challenges
Problem encountered: GitHub.com became extremely slow after implementing DoT DNS in OPNsense for a week. The likely cause is GitHub’s security policy blocking DoT requests. I tested multiple DNS providers—Cloudflare, Google DNS, Quad9, and OpenDNS—through the OPNsense Unbound DNS DoT settings, but performance remained poor. My solution was to set up a dedicated VM specifically for GitHub.com work
Final Thoughts
Securing your DNS queries is a fundamental step toward building a more private and secure home network. By leveraging the power of OPNsense and Unbound DNS, you can easily implement this protection for every device in your home. It’s a simple change that makes a significant difference in your online privacy and security posture. So, choose your provider, configure your OPNsense box, and start browsing with peace of mind.