Introduction
In our previous post, we demonstrated how to set up a basic Ansible demo environment with a control node and a target In the previous post, we built a basic Ansible demo environment with a control node and a target node. Now it’s time to write your first real playbook—a simple but essential step in automating your infrastructure.
In this post, we’ll walk you through a playbook that installs baseline server applications commonly needed on any fresh Linux server. These include useful command-line tools like vim, htop, and curl—packages that form the foundation for productivity, debugging, and remote access management.
This will help you standardize server environments quickly and consistently, especially when deploying new systems in bulk.
How the Setup Would Look Like?
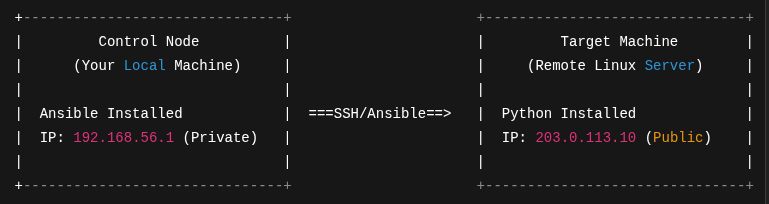
📡 Network Diagram
📁 Directory Structure
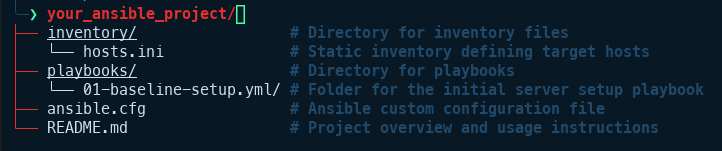
📄 Feel free to add any number of host groups to your inventory/hosts.ini file; you’ll refer to these groups by their names when running playbooks.
# ==========================
# Ansible Inventory File
# ==========================

# Syntax Reference:
# [group_name]         <-- Group of hosts
# IP_or_Hostname       ansible_user=username   ansible_port=port_number

# ------------------------------------
# Infrastructure Linux Hosts
# ------------------------------------
[Debian_Linux]
203.0.113.10        ansible_user=admin1      ansible_port=2222

# ------------------------------------
# Cisco Network device
# ------------------------------------
# [L2 Switches]
# 10.1.5.150     ansible_user=cisco          ansible_port=22
# 10.1.5.100     ansible_user=cisco          ansible_port=22


# -----------------------------------
# Business Unit 1 Servers
# -----------------------------------
# [Business_Unit1]
# 172.16.23.210    ansible_user=svc12345   ansible_port=3333
# 172.16.23.220    ansible_user=svc12345   ansible_port=3333
⚙️ For your Ansible configuration, the ansible.cfg file should be placed in your current directory. This location holds the second highest precedence in Ansible’s configuration loading order. Ensure this file contains your desired settings, and specifically, do not comment out line 2. To prevent confusion, it’s recommended to use only one ansible.cfg file. Remember the full precedence order is:
1. ANSIBLE_CONFIG environment variable,
2. ansible.cfg in the current directory,
3. ~/.ansible.cfg in the home directory
4. /etc/ansible/ansible.cfg.
Note: that in enterprise environments with dedicated Ansible servers, configurations are often found in the ANSIBLE_CONFIG environment variable or /etc/ansible/ansible.cfg.
[defaults]
inventory = ./inventory/hosts.ini      # Path to your inventory file
# remote_user = ansible_user           # Default SSH user (can be overridden per host)
# host_key_checking = False            # Disable SSH host key checking
# timeout = 30                         # SSH connection timeout
# retry_files_enabled = False          # Disable creation of *.retry files
# interpreter_python = auto_silent     # Let Ansible auto-detect Python path silently

[privilege_escalation]
# become = True                        # Enable privilege escalation (like sudo)
# become_method = sudo
# become_user = root
# become_ask_pass = False
📝 This basic playbook for essential setup is located at playbook/01-baseline-setup.yml.
- Feel free to customize the list of applications to install as needed. Note that line 3 specifies the target hosts by referencing a group name you defined in your
hosts.iniinventory file. - Should you forget to remove something during a previous run, you can add it to the
packages_to_uninstalllist for the next execution. - Please pay close attention to the spacing in this YAML playbook file. Using an editor like VS Code with a YAML extension is highly recommended to help ensure correct formatting.
---
- name: Initial Server Setup with Install/Uninstall Options
  hosts: Debian_Linux # Your target host group
  become: true # Requires root privileges

  # Define variables for packages to install and uninstall
  # You can override these using --extra-vars on the command line,
  # inventory variables, or group/host_vars files.
  vars:
    packages_to_install:
      - docker.io
      - docker-compose
      - htop
      - curl
      - vim
      - nano
      - git
      - neofetch
      - inxi
      - netcat-openbsd
      # Add packages here that you always want to install by default

    packages_to_uninstall:
      # Add packages here that you want to uninstall when running with the uninstall task enabled
      # - vim
      # - nmap

  tasks:
    - name: Update apt cache
      ansible.builtin.apt:
        update_cache: yes
        cache_valid_time: 3600 # Cache valid for 1 hour
      when: package_update | default(false) # Only run if package_update is true

    - name: Upgrade all packages
      ansible.builtin.apt:
        upgrade: dist
      when: package_upgrade | default(false) # Only run if package_upgrade is true

    - name: Install specified packages
      ansible.builtin.apt:
        name: "{{ packages_to_install }}" # Use the variable for the list of packages
        state: present # Ensure packages are installed
      when: packages_to_install is defined and packages_to_install | length > 0 # Only run if the list is defined and not empty

    - name: Uninstall specified packages
      ansible.builtin.apt:
        name: "{{ packages_to_uninstall }}" # Use the variable for the list of packages
        state: absent # Ensure packages are removed
        purge: yes # Optionally remove configuration files as well
        autoremove: yes # Optionally remove dependencies no longer needed
      when: packages_to_uninstall is defined and packages_to_uninstall | length > 0 # Only run if the list is defined and not empty
      tags:
        - uninstall # Add a tag to easily run this task specifically
🚀 Running Your Playbook from your_ansible_project directory:
ansible-playbook playbook/01-baseline-setup.yml

# If you want to run only Uninstall task and the rest remain the same
ansible-playbook playbook/01-baseline-setup.yml --tags uninstall
If your configuration is correct, you should see Ansible execute each task and apply the changes to your target node(s). Try modifying the playbook and running it again to observe how the behavior changes. If you encounter failures, use them as opportunities to adjust settings in your ansible.cfg and deepen your understanding.
Final Thoughts
This first playbook might look simple, but it’s a powerful start. Automating baseline package installation ensures that every server you spin up is equipped with essential tools—no manual setup required.
As you grow more confident with Ansible, you can expand your playbooks to include user management, security hardening, service deployment, and more. But for now, this clean and focused playbook gets the job done and gives you a solid foundation.