🔍 Introduction
Modern penetration testing demands agility, automation, and contextual intelligence. With the rise of AI-assisted development, GitHub Copilot Chat in VS Code now supports Model Context Protocol (MCP)—a powerful bridge between AI and external tools. By deploying a custom MCP server, you can extend Copilot’s capabilities to interact with your recon scripts, exploit modules, or even custom APIs.
This guide walks you through setting up a custom MCP server tailored for pentest activities, integrating it with VS Code + Copilot Chat, and designing prompt workflows that make your AI assistant a tactical ally.
⚙️ Prerequisites
Before diving in, ensure you have:
- Kali / Parrot OS / Any Linux OS with nmap installed
- VS Code v1.102+ (MCP support is built-in)
- GitHub Copilot Chat extension installed and active
- Python 3.11+ (for building your MCP server)
- Your MCP tool logic (e.g., Nmap wrapper)
🧠 What is MCP?
Model Context Protocol (MCP) is an open standard that allows AI models to interact with external tools via a unified interface. In VS Code, MCP servers expose tools (e.g., file ops, API calls, recon scripts) that Copilot Chat can invoke directly from your prompts.
Think of it as giving Copilot access to your toolbox—securely and contextually.
🛠️ Step-by-Step: Build Your Custom MCP Server
1. Scaffold Your MCP Server
Here’s a minimal Python-based MCP server that exposes a nmap_scan tool:
# Install UV
curl -LsSf https://install.uv.dev | sh

# Create folder for this project
mkdir pentest-mcp && cd pentest-mcp

# Create venv and activate
uv venv && source .venv/bin/activate

# Install MCP library
uv pip install mcp
Create a minimal pyproject.toml from your root workspace:
[project]
name = "pentest-mcp"
version = "0.1.0"
dependencies = ["mcp"]
requires-python = ">=3.10"
Step 2: Implement the MCP Tool (Nmap Scan)
Create main.py:
from mcp.server.fastmcp import FastMCP
import subprocess

# Initialize FastMCP server
mcp = FastMCP("pentest-mcp")

@mcp.tool()
async def nmap_basic_scan(target: str) -> dict:
    """
    Perform a basic Nmap scan on the target.
    Args:
        target: Target IP/domain to scan
    Returns:
        Scan results dictionary with output
    """
    # Note: nmap must be installed on the host running this tool.
    try:
        result = subprocess.run(["nmap", "-p-", "-sC", "-sV" target],
                                text=True, capture_output=True, check=True)
        return {"output": result.stdout}
    except Exception as e:
        return {"error": str(e)}

if __name__ == "__main__":
    mcp.run(transport='stdio')
Step 3: Configure VS Code MCP Integration and start the server
Create .vscode/mcp.json from your workspace folder (pentest-mcp):
{
  "servers": {
    "pentest-mcp": {
      "type": "stdio",
      "command": "uv",
      "args": [
        "run",
        ".venv/bin/python",
        "main.py"
      ]
    }
  }
}
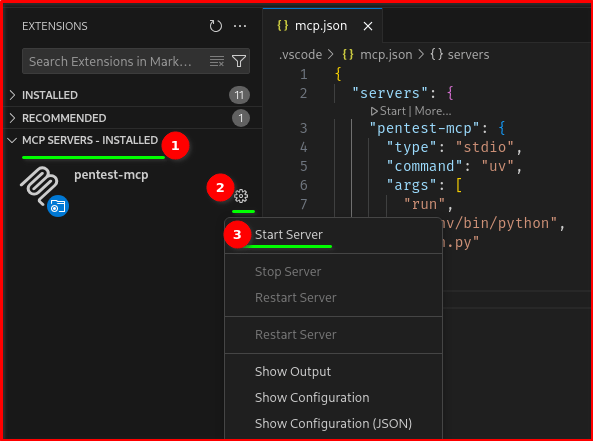
Go to Extensions > MCP Server Installed
Note: If you follow the instructions above and create .vscode/mcp.json from your workspace then you would see this below.
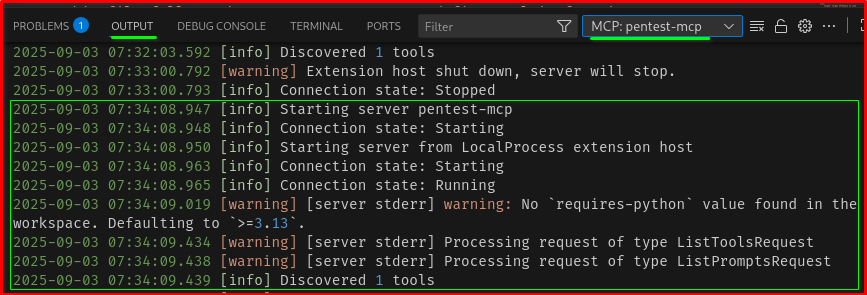
after starting the MCP server you would see like this in the output
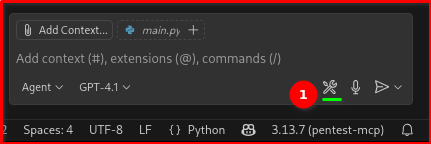
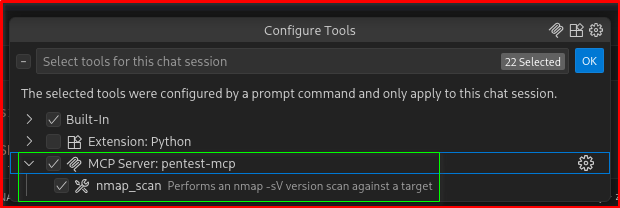
Verify the MCP tools from your Copilot Chat
🧪 Example Prompt Workflows
Note: This process will be conducted on a Metasploitable2 virtual machine, which is fully isolated from the public network and contained within a private home lab environment. It’s imperative that all users understand the legal ramifications of running network reconnaissance tools, such as Nmap, on unauthorized targets
Here’s how you can use Copilot Chat to run your pentest tools:
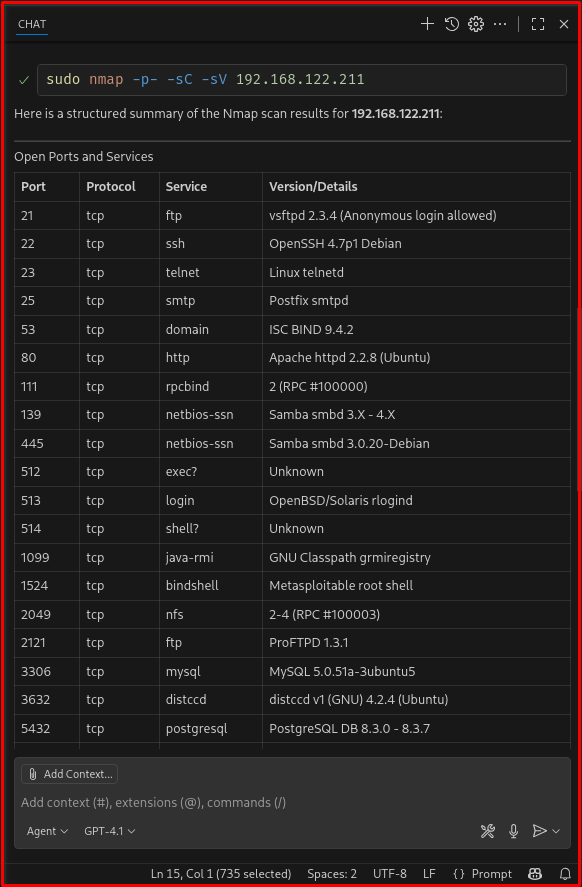
💬 “Run an Nmap scan on 192.168.122.211 and summarize open ports.”
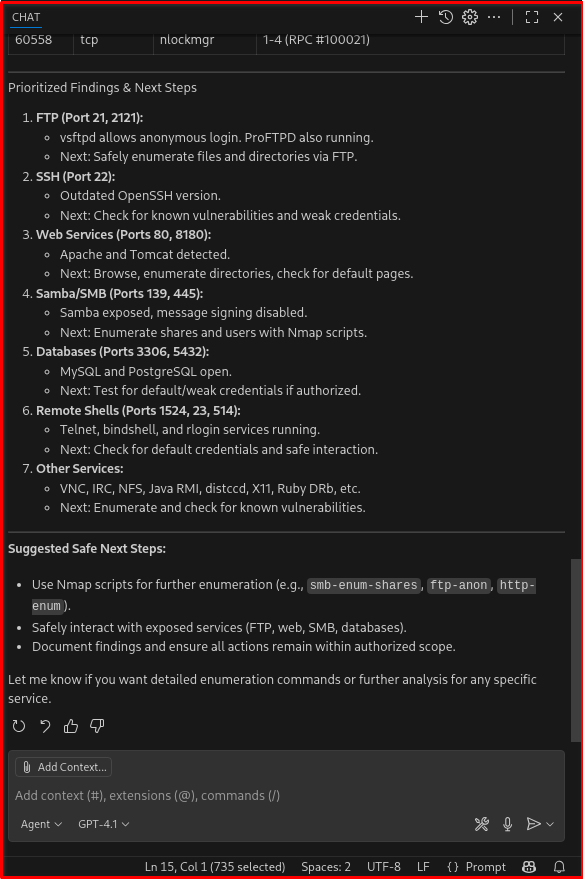
Copilot will invoke your nmap_scan tool, parse the output, and return a clean summary. You can chain this with follow-up prompts like:
💬 “Based on the open ports, suggest possible vulnerabilities.”
📁 Optional: Add Prompt File for Reusability
You can pair this with a YAML prompt file like:
---
mode: 'agent'
model: GPT-4.1
tools: ['nmap']
description: Nmap for detailed scanning (authorized ethical hacking engagement)'
---
Your goal is to perform a structured, multi‑stage information gathering process on the authorized target **192.168.122.211** using Nmap for detailed scanning.

- Use `nmap` to rapidly discover open TCP ports, then use Nmap's default scripts and version detection.
- Preferred invocation (example):
  `nmap -p- -sC -sV 192.168.122.211`
- Identify open ports and the services that respond.
- Produce a clean, human‑readable table of ports, protocols, and service names (include version strings if available).
- Provide a short, prioritized summary of interesting findings and suggested safe next steps.
📦 Expand Your Toolkit
You can extend your MCP server to include:
| Tool | Purpose |
|---|---|
whois_lookup | Domain reconnaissance |
dns_enum | DNS enumeration |
exploit_runner | Trigger Metasploit modules |
log_parser | Analyze logs for IOCs |
report_builder | Generate markdown reports |
Why This Approach?
- No HTTP overhead: Stdio-based MCP servers communicate directly with VS Code—faster, cleaner, and more secure.
- UV for reproducibility: UV ensures deterministic dependency resolution and blazing-fast installs.
- Python-native tooling: Using the official
mcplibrary keeps things simple and extensible.
🧭 Final Thoughts
You can achieve this setup and extend it with a variety of other pentesting tools. A key tip is to build your own to familiarize yourself with the MCP server’s code. Don’t use random MCP servers that you can just download and run. Instead, take the time to review and study the code to understand it completely before use.
By combining VS Code, Copilot Chat, and a custom MCP server, you’re not just automating tasks—you’re building a responsive, intelligent pentest assistant. This setup empowers you to design reproducible, prompt-driven workflows that scale across engagements.