Introduction
Virtualization is a powerful tool, but configuring the network to meet your specific needs can sometimes be a challenge. If you’ve ever used VirtualBox, you’re likely familiar with the “Host-only” network—a private, isolated environment where your virtual machines can communicate with each other and the host machine, but have no access to the outside world. This setup is perfect for development, testing, or creating closed lab environments. If you’re a libvirt user and want to achieve the same isolation, you might have struggled with the correct configuration. In this post, we’ll walk through the process of creating a libvirt network that functions exactly like a VirtualBox Host-only network, ensuring your VMs are securely isolated while maintaining internal connectivity.
Step by Step Walkthrough
1. Create the Network Definition File
First, you need to create an XML file that defines the network’s properties. This file specifies the name of the network, the bridge device, and the IP addressing scheme.
Create a new file, for example, hostonly-network.xml, with the following content.
<network>
  <name>hostonly-bridge-55</name>
  <forward mode='none'/>
  <bridge name='virbr55' stp='on' delay='0'/>
  <ip address='10.10.55.1' netmask='255.255.255.0'>
    <dhcp>
      <range start='10.10.55.101' end='10.10.55.199'/>
    </dhcp>
  </ip>
</network>
Network Configuration Setup
Network Name: hostonly-bridge-55
Network Type: Host-only network (isolated)<forward mode='none'/> means no packet forwarding – VMs can communicate with each other and the host, but cannot reach external networks or the internet
Bridge Configuration:
Bridge name: virbr55 – This is the virtual bridge interface that will be created on the hostSTP (Spanning Tree Protocol): Enabled (stp=’on’) – Prevents network loopsDelay: 0 – No delay for port state transitions
IP Configuration:
Host IP: 10.10.55.1 – The host system will have this IP on the bridge interface
Netmask: 255.255.255.0 (equivalent to /24 CIDR notation)
Network range: 10.10.55.0/24 (256 addresses total)
DHCP Configuration:
DHCP range: 10.10.55.101 to 10.10.55.199 (99 available IP addresses for VMs)
Reserved IPs: 10.10.55.1 (host), 10.10.55.2-10.10.55.100 (available for static assignment)
2. Define and Start the Network
With the XML file created, use the virsh command-line tool to define the network in libvirt.
Step 2.1 Define the network:
sudo virsh net-define hostonly-network.xml
Step 2.2 Start the network:
sudo virsh net-start hostonly-bridge-55
Step 2.3 Set the network to autostart on boot:
sudo virsh net-autostart hostonly-bridge-55
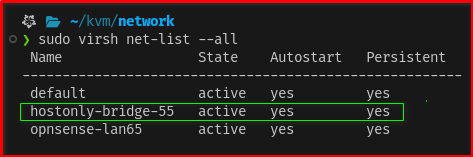
Step 2.4 You can now verify that the network is running with
sudo virsh net-list --all
3. Attach a Virtual Machine to the Network
Once the network is running, you can connect a virtual machine to it. You can do this by editing the virtual machine’s XML configuration.
Edit the VM’s (Guest OS) XML:
sudo virsh edit your-vm-name
Add a network interface: Find the <devices> section and add the following <interface> block, which connects the VM’s virtual NIC to the new hostonly-bridge network.
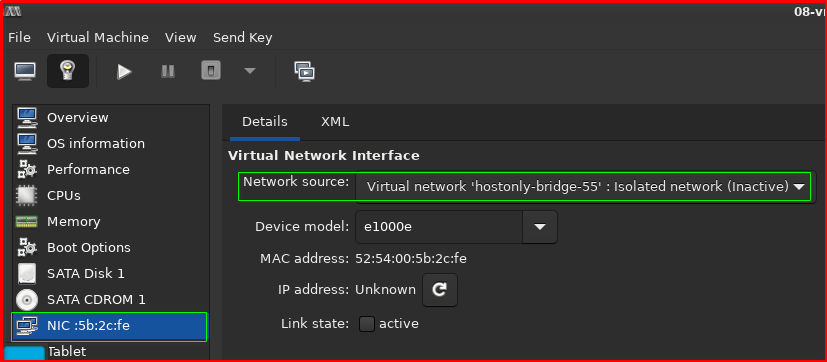
Via virt-manager GUI
What this network provides:
- Isolated environment – VMs can communicate with each other and the host but not with external networks
- Automatic IP assignment – VMs will get IPs between .101-.199 via DHCP
- Host accessibility – The host is reachable at 10.10.55.1
- VM-to-VM communication – All VMs on this network can communicate with each other
Use Cases:
- Testing environments that need isolation from the internet
- Lab setups where you want controlled networking
- Development environments with multiple VMs that need to communicate
- Security testing where you want contained network
Final Thoughts
By using libvirt‘s isolated network mode (forward mode='none'), you can easily replicate the Host-only networking experience from VirtualBox. This approach provides a powerful and secure way to create development and testing environments where you have full control over the network without any external interference. The key is understanding that libvirt‘s network definitions are flexible and can be tailored to various use cases, from simple isolated labs to more complex bridged setups. With this configuration, you now have a robust, private virtual network for your guests to communicate with each other and your host, all while staying safely disconnected from the public internet.