New Blog Post: OpenSSH – Secure Remote Access, Made Simple
Whether you’re managing a cloud server, configuring remote access to your homelab, or setting up DevOps workflows, OpenSSH is likely at the core of your toolkit. In my latest blog post, I take a practical, cross-platform look at OpenSSH—from installation on Linux, macOS, Windows, Concept of Remote Access and troubleshooting tips.
🚀 Highlights:
- How to install OpenSSH on any major OS
- Secure key-based authentication setup
- Client and server configuration examples
- What is remote access in SSH
- Common SSH errors and how to fix them
Introduction
OpenSSH is a widely used tool for secure remote login, command execution, file transfers, and tunneling. It replaces older, insecure methods like Telnet and rsh, offering encrypted communication between machines over untrusted networks. Whether you’re managing a personal server or maintaining enterprise infrastructure, OpenSSH is likely at the core of your secure connectivity toolkit.
Brief History
OpenSSH originated in 1999 as a fork of the original SSH software developed by Tatu Ylönen. Created by the OpenBSD project, OpenSSH aimed to offer a fully open-source, security-focused alternative. Over the decades, it became the de facto standard for secure shell access across Unix-like systems, and later, Windows.
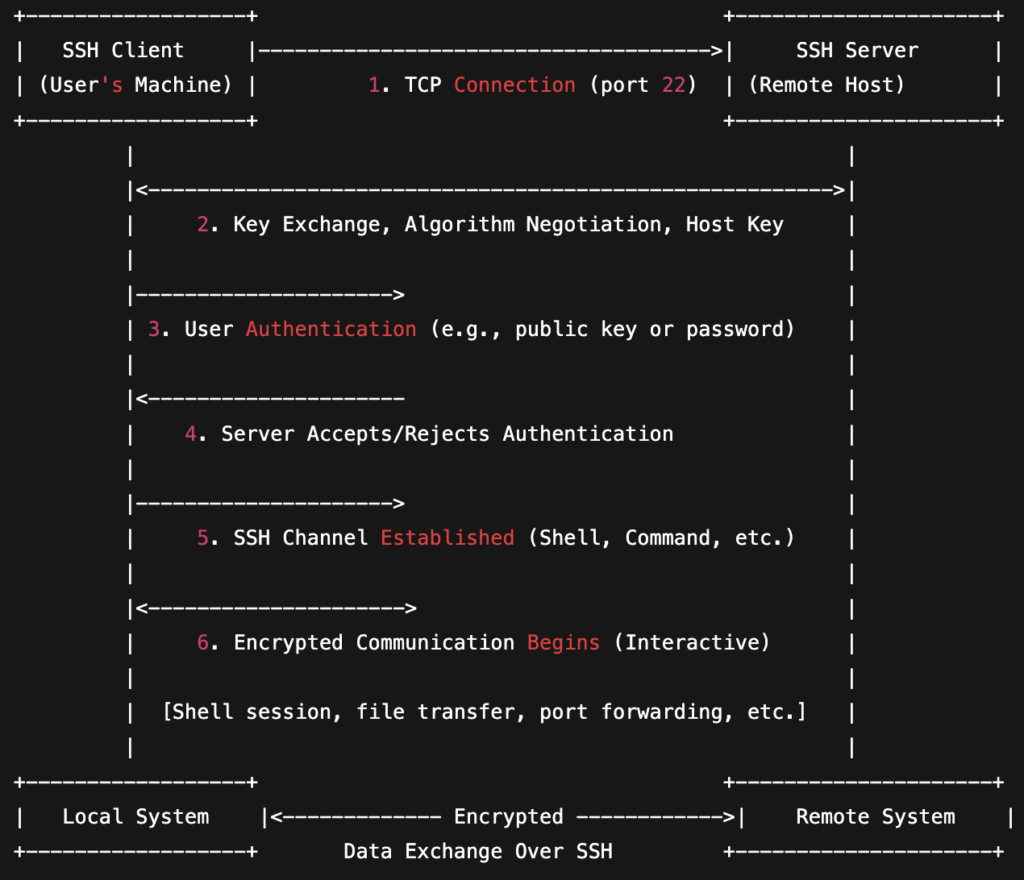
SSH Client-Server Architecture
OpenSSH Support on Major Platforms
| Feature | Linux (Debian/RedHat) | macOS | Windows 10/11 |
|---|---|---|---|
| Default Availability | Pre-installed or via package | Pre-installed (since 10.13) | Optional Feature |
| Package Manager | apt, dnf, yum, zypper | brew (for updates) | PowerShell / GUI Settings |
| Config File (Client) | ~/.ssh/config | ~/.ssh/config | %USERPROFILE%\.ssh\config |
| Config File (Server) | /etc/ssh/sshd_config | /etc/ssh/sshd_config | C:\ProgramData\ssh\sshd_config |
| Service Manager | systemctl, service | launchctl | Windows Services (services.msc) |
| GUI Tools Available | Optional (e.g., Remmina) | Terminal or 3rd-party GUI | Windows Terminal, PuTTY |
Note: OpenSSH was made available as an optional feature in Windows 10 starting with build 1809 and in Windows Server 2019. This means that for these operating systems, OpenSSH was already included as a feature that could be installed and enabled using optional features. However, the specific version of OpenSSH that was included with these builds could vary. For example, some users reported having OpenSSH version 7.7 installed on Windows Server 2019.
Installation
Linux
Most distributions include OpenSSH out of the box. If not, install it manually:
# Debian/Ubuntu
sudo apt update && sudo apt install openssh-server

# RHEL/Fedora/CentOS
sudo dnf install openssh-server

# Enable and start SSH
sudo systemctl enable ssh
sudo systemctl start ssh
macOS
OpenSSH comes pre-installed on macOS (High Sierra and above).
# To update or reinstall:
brew install openssh

# To start the server manually:
sudo systemsetup -setremotelogin on
Windows
OpenSSH client is included by default on Windows 10 and 11. To enable the server:
- Go to Settings → Apps → Optional Features
- Click Add a Feature and install OpenSSH Server
- Start the service via PowerShell:
Start-Service sshd
Set-Service -Name sshd -StartupType 'Automatic'
Remote Access
What Is Remote Access in SSH?
When we say SSH enables remote access, we’re referring to the ability to securely connect to another computer over a network—whether it’s a server, a cloud VM, a Raspberry Pi at home, or any other machine running an SSH server.
This kind of access is “remote” because:
- You’re not physically in front of the machine.
- You’re connecting to it over a network (LAN or internet).
- You’re authenticated and granted access through a secure, encrypted channel.
Why Remote Access Matters
Remote access is the core reason SSH exists. It lets system administrators, developers, and DevOps engineers:
- 🧑💻 Manage servers from anywhere
- 🐞 Troubleshoot issues without needing physical presence
- 🔄 Update applications or services on live systems
- 🔐 Do all of this securely—preventing eavesdropping and unauthorized access
What Happens When You SSH Into a Remote System?
When you type a command like:
ssh user@192.168.1.100
Here’s what happens:
- ✅ Your client contacts the remote server over port
22(or custom port). - 🔒 Both sides negotiate encryption to secure the session.
- 🧾 You authenticate using a password or SSH key.
- 🖥️ Once authenticated, you get a shell prompt—just like working on the machine directly.
It’s as if you were sitting at the keyboard and monitor of that remote computer—but you’re not. You’re controlling it from your local terminal.
Without SSH?
Before SSH, remote access used insecure tools like:
- Telnet (unencrypted text)
- FTP (no encryption)
- rlogin and rsh (insecure and outdated)
SSH replaced these by offering encrypted, authenticated, and reliable remote access.
Secure key-based authentication setup
Key-based authentication is the recommended approach for SSH connections as it’s more secure than password authentication. Here’s an overview of how to set it up:
Basic Concept
Instead of using passwords, SSH key-based authentication uses a pair of cryptographic keys:
- A private key (kept secret on your client machine)
- A public key (placed on servers you want to connect to)
Setting Up SSH Keys
1. Generate a key pair on your client machine:
ssh-keygen -t ed25519 -C "your_email@example.com"
(Ed25519 is recommended for new keys, but RSA with 4096 bits is also good)
2. Copy your public key to the server:
ssh-copy-id username@server_address
This adds your public key to the ~/.ssh/authorized_keys file on the server
3. Test the connection without a password:
ssh username@server_address
Security Best Practices
- Use a passphrase to encrypt your private key
- Keep your private key secure and never share it
- Use different keys for different servers/purposes in sensitive environments
- Regularly rotate keys in high-security environments
- Consider disabling password authentication entirely once key-based auth is working
Server Configuration
In /etc/ssh/sshd_config, for maximum security:
PasswordAuthentication no
ChallengeResponseAuthentication no
UsePAM no
Regular User and Service Account in SSH
SSH capabilities typically aren’t automatically available to new user accounts on either Linux or Windows systems – you’ll need to set them up specifically.
For Linux users:
- New users can use SSH client functionality by default (to connect to other systems)
- For users to receive SSH connections, they need to be added to appropriate groups or have permissions configured
- No special action is needed if they only need to make outgoing connections
For Windows users:
- Newer Windows 10/11 versions do include OpenSSH
- New users will need the OpenSSH client installed to make outgoing connections
- For receiving connections, OpenSSH Server must be installed and configured for those users
Troubleshooting Common SSH Issues
🔒 Permission Denied (publickey)
Check file permissions:
### Unix/Linux/MacOS ###
chmod 700 ~/.ssh                 # Only owner can read/write/execute
chmod 600 ~/.ssh/authorized_keys # Only owner can read/write
chmod 600 ~/.ssh/id_*            # Private key should be read/write only for owner

### PowerShell Windows ###
# Replace 'YourUser' with your actual username
cd $HOME\.ssh

# Grant full control to yourself and remove access from others
icacls . /inheritance:r /grant:r "$env:USERNAME:F"
icacls authorized_keys /inheritance:r /grant:r "$env:USERNAME:R"
icacls id_rsa /inheritance:r /grant:r "$env:USERNAME:R"
icacls id_ed25519 /inheritance:r /grant:r "$env:USERNAME:R"

# Explanation
# /inheritance:r — Remove inherited permissions
# /grant:r — Replace existing permissions with the specified ones
# :F — Full control (for directories like .ssh)
# :R — Read-only (for files like private keys)
# You may want to use :R for private keys and :RX for public keys (id_*.pub)

# Verify Permissions
icacls .
icacls authorized_keys
icacls id_ed25519
Ensure server-side sshd_config has:
PubkeyAuthentication yes
🧪 Cannot Connect (Connection Refused)
# Is the SSH service running?
sudo systemctl status ssh

### Check Firewall and allow
# UFW
sudo ufw allow 22/tcp

# iptables
sudo iptables -A INPUT -p tcp --dport 22 -j ACCEPT

# Firewalld
sudo firewall-cmd --permanent --add-port=22/tcp
sudo firewall-cmd --reload
Windows PowerShell:
# Windows Command Line via netsh command
netsh advfirewall firewall add rule name="OpenSSH Port 22" `
     dir=in action=allow protocol=TCP localport=22

# Windows PowerShell
New-NetFirewallRule -DisplayName "OpenSSH Port 22" `
    -Direction Inbound -Protocol TCP -LocalPort 22 `
    -Action Allow
🔁 Unexpected Disconnects
# Check ClientAliveInterval and server logs:
journalctl -u ssh
Final Thoughts
OpenSSH remains a pillar of secure remote access, indispensable for developers, sysadmins, and DevOps engineers alike. It’s flexible, scriptable, and secure when properly configured. Learning to master OpenSSH is an investment that pays off across all your computing workflows.
In the next part of this series, we’ll dive into what makes SSH truly powerful—remote command execution, file transfers (SCP/SFTP), and tunneling (port forwarding). These features turn SSH from just a remote login tool into a secure multitool for sysadmins and DevOps pros.