Introduction
Are you tired of the limitations of your consumer-grade router? As your homelab grows, so does the need for more granular control, enhanced security, and the flexibility to segment your network. Off-the-shelf routers are great for basic internet access, but they often fall short when it comes to the advanced features required to manage a complex home network with multiple virtual machines, servers, and IoT devices. You need a solution that can evolve with your lab, providing robust protection and sophisticated networking capabilities.
This is where OPNsense comes in. OPNsense is a powerful, open-source firewall and routing platform based on FreeBSD. It’s a professional-grade solution that brings enterprise-level features to your home network. OPNsense offers an extensive suite of tools, including support for VLANs to segment your network, an integrated Intrusion Detection/Prevention System (IDS/IPS) to block threats in real time, VPN capabilities for secure remote access, and advanced traffic shaping to prioritize critical data. Its flexibility is a major advantage, as it can be deployed on a wide range of dedicated hardware or, as we will explore in this guide, as a virtual machine. With a strong focus on security and a continuous development cycle, OPNsense ensures your network is protected with the latest defenses.
The purpose of this guide is to walk you through the process of setting up OPNsense as a perimeter firewall for your homelab, specifically within a virtualized environment using KVM/QEMU and Libvirt. We will cover everything from allocating the right resources to the initial installation, laying the foundation for a secure, flexible, and high-performance home network.
VM Resource Allocation
OPNsense can run on modest hardware, but for a perimeter firewall in a homelab, it’s best to go beyond the bare minimum to support features like intrusion detection/prevention, VPN services, and robust logging.
- CPU:
- Minimum: A single virtual core is enough for basic routing and firewall rules.
- Recommended: Allocate 2 to 4 virtual cores to the VM. This provides ample power for managing multiple network connections and running CPU-intensive services.
- RAM:
- Minimum: 2GB of RAM is the absolute minimum to get OPNsense installed and running.
- Recommended: Allocate 4GB to 8GB of RAM or more. This is crucial if you plan to enable services like Zenarmor (IDS/IPS) or a caching proxy. Keeping logs in RAM is also an option that improves performance and reduces writes to the disk, which benefits solid-state drives.
- Storage:
- Minimum: A small virtual disk of 4GB to 8GB is enough for the OS itself.
- Recommended: A virtual disk of at least 40GB to 120GB is highly recommended. This allows for ample space for the operating system, package installations, and log files, especially if you enable verbose logging or a proxy cache. A dynamically allocated disk is a good choice to conserve space on the host machine.
- Network Interfaces:
- You must assign at least two virtual network interfaces to the OPNsense VM.
- One will be for the WAN (Wide Area Network), which connects to your internet service provider’s modem.
- The other will be for the LAN (Local Area Network), which connects to your home network switch. For the best performance, consider using VirtIO drivers for the virtual NICs.
Initial Setup and Installation
Required: Extensive virtualization experience with VMware Workstation or VirtualBox. Users with KVM/QEMU and Libvirt homelab environments should practice guest OS installations to build familiarity and confidence.
Pre-requisite: Build your Network Bridge (Please refer to this installation guide including the section 8 bridge network setup.) and LAN Network (somewhat like Host-only without DHCP remove line 7-9 in my sample xml code).
Once your host machine is configured with KVM/QEMU and Libvirt, and you’ve downloaded the OPNsense ISO, you’re ready to create and install the VM.
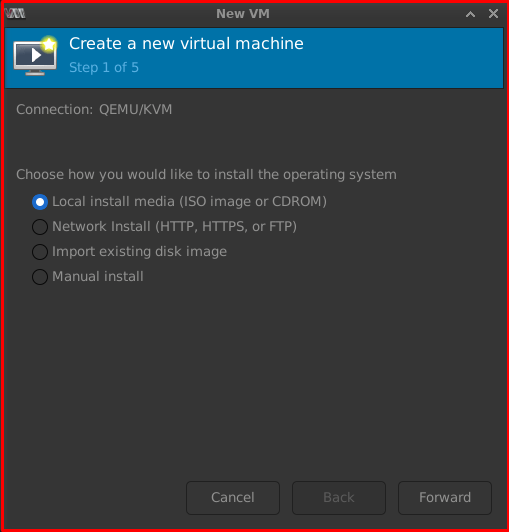
1. Create the VM: Use a tool like virt-manager. During this process, you will define the virtual hardware—cores, RAM, disk size, and network interfaces—based on the recommendations above. Ensure the OPNsense ISO is attached as a virtual CD-ROM drive.
Step 1 of 5: Local ionstall media (ISO image or CDROM)
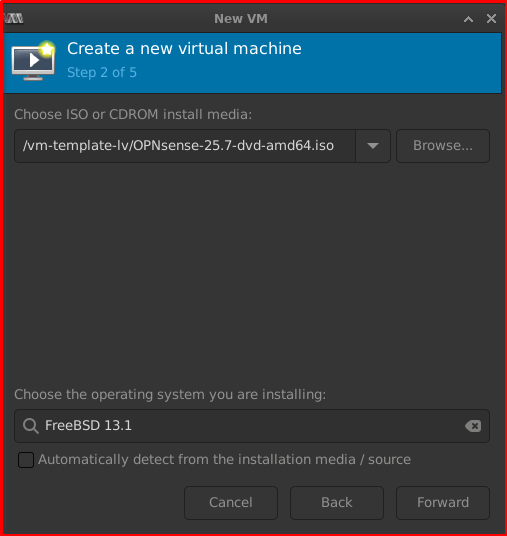
Step 2 of 5: Browse your ISO file and select FreeBSD 13.1 as latest available in libvirt
Note: The OPNSense ISO file was build from latest version of FreeBSD 14.3
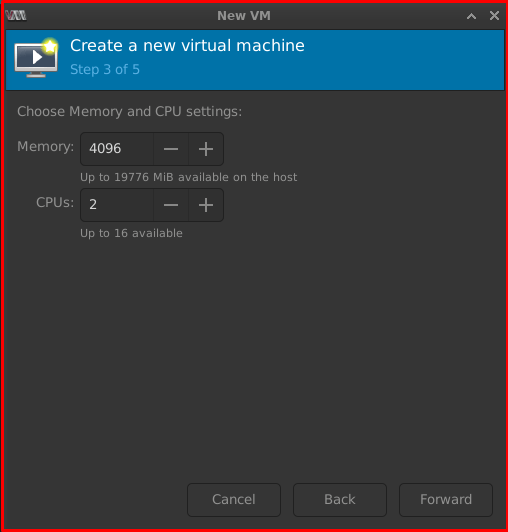
Step 3 of 5: Allocate your RAM and CPU resource here.
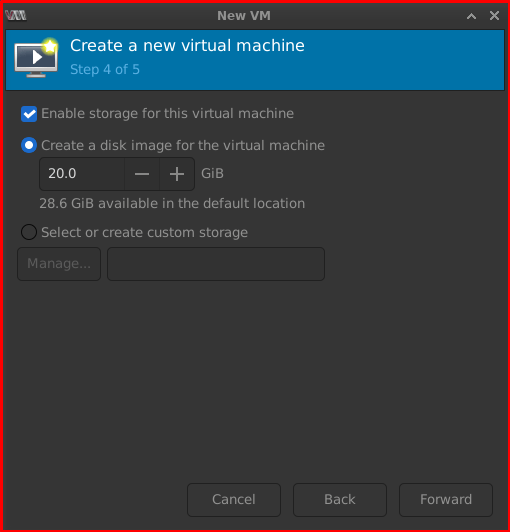
Step 4 of 5: Allocate your Storage here
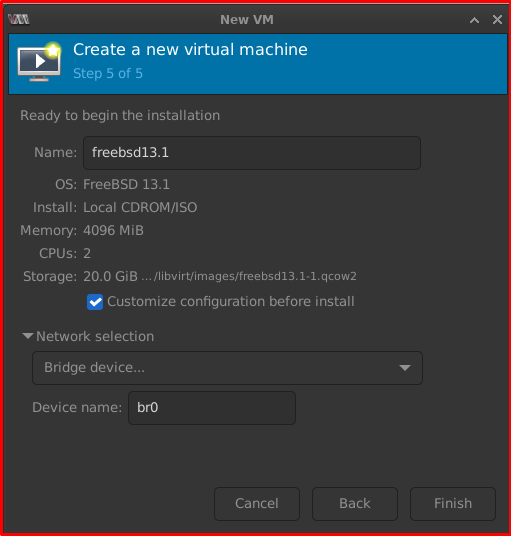
Step 5 of 5: Change the name OPNSense-VM-Firewall, select your bridge network and check the box “Customize configuration before install”
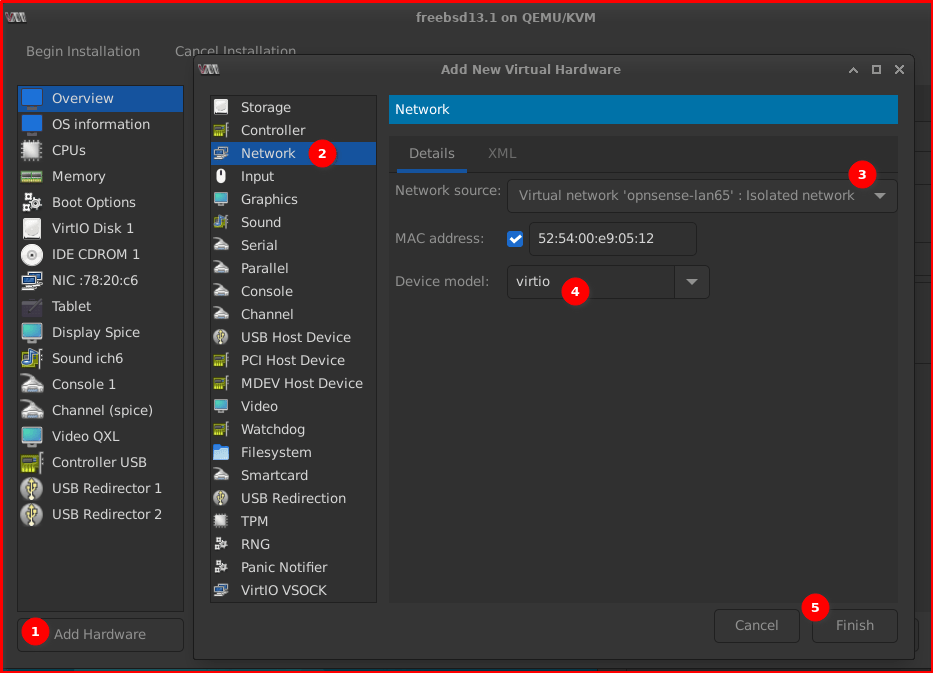
Add the 2nd Network Device.
– How to add Host-only Network for your LAN connection
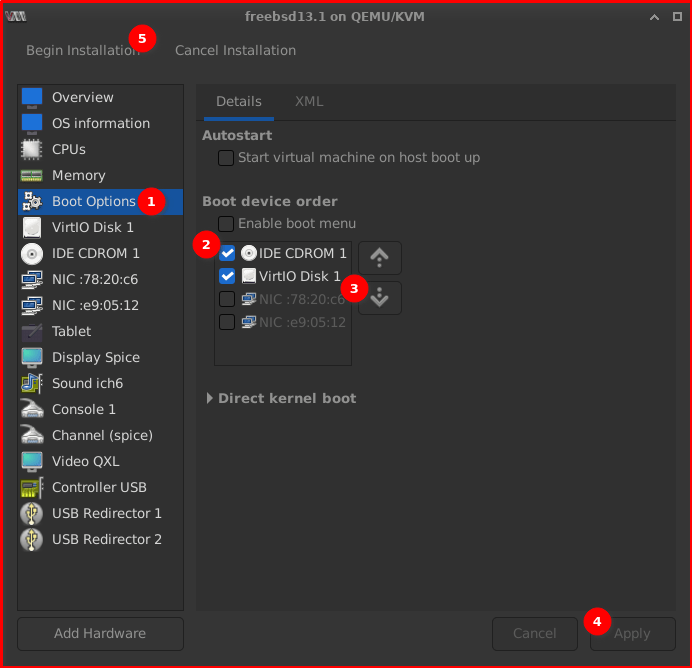
In the Boot Options select IDE CDROM 1 as first boot by default it was selected to boot in Virtio Disk 1
2. Boot the VM: Power on the new virtual machine. It should boot directly into the OPNsense installer.
3. Run the Installer:
Note: The wizard installer uses the same approach as early 2010s firewall solutions like pfSense, Untangle, SmoothWall, and m0n0wall. The critical aspect is properly identifying WAN and LAN interfaces. For newcomers, the comprehensive wizard design ensures IT professionals can navigate the process easily
– At the login prompt, enter installer as the username and opnsense as the password.
– Follow the on-screen prompts to select your keyboard layout and installation method. The “Quick/Easy Install” option is usually sufficient for a standard setup.
– Storage: Select ZFS offers more data integrity features but can be more resource-intensive
– Select the virtual disk you allocated earlier as the installation target.
– The installer will then ask you to set a root password. Choose a strong, secure password, as this will be your primary administrative login.
4. Reboot and Interface Assignment:
– After the installation is complete, the VM will reboot. Be sure to remove the virtual installation media so it boots from the newly installed virtual hard disk.
– In my screenshot above the first boot was assigned to IDE CDROM 1 you need to uncheck and select the VirtiO Disk 1 as primary boot.
– The OPNsense console will boot, and you will be prompted to assign network interfaces. This is a crucial step.
– The system will present a list of available network interfaces, which will be the virtual NICs you created. You will need to identify and assign one to the WAN and one to the LAN.
After these steps, your OPNsense VM will be installed and have basic network connectivity. The next stage, which we’ll cover in a future blog post, involves accessing the Web UI, performing the initial configuration wizard, and securing the perimeter with firewall rules and other services.
Up Next
In the next blog post, we’ll dive into the Post-Installation and Web UI Configuration and then move on to Securing the Perimeter: Key Configurations. We will walk through the initial setup wizard, create a dedicated administrative user, and start building your firewall rules to secure your homelab environment