Introduction: The Guardian of Web Security
In an era where data breaches make headlines almost daily, and cyberattacks grow increasingly sophisticated, the security of our web applications has never been more critical. Did you know that over 70% of successful cyberattacks target web applications? As developers, testers, and security professionals, we bear the immense responsibility of building and maintaining secure online experiences. But how do you effectively identify and mitigate vulnerabilities before malicious actors exploit them? Enter OWASP ZAP.
OWASP ZAP, short for OWASP Zed Attack Proxy, is a free, open-source web application security scanner. Developed and maintained by the Open Web Application Security Project (OWASP) community, ZAP is designed to help you find security vulnerabilities in web applications during the development, testing, and deployment phases. It acts as a “man-in-the-middle” proxy, allowing you to intercept, inspect, and modify traffic between your browser and the web application.
The digital landscape is rife with common web vulnerabilities like SQL Injection, Cross-Site Scripting (XSS), Broken Authentication, and insecure direct object references, to name a few. These flaws can lead to data theft, unauthorized access, and significant reputational damage. ZAP empowers you to proactively identify these weaknesses, shifting security left in the development lifecycle. It’s an indispensable tool for anyone involved in web development, quality assurance, or cybersecurity, enabling you to build more resilient and trustworthy applications.
Getting Started with OWASP ZAP: Installation & Setup
Before we dive into scanning, let’s get OWASP ZAP up and running on your system.
A. Downloading ZAP: The first step is to download the appropriate installer for your operating system. You can always find the latest stable release on the official OWASP ZAP website: https://www.zaproxy.org/download/
ZAP offers installers for:
- Windows
- macOS
- Linux (various distributions)
B. Installation Process (Examples for Windows, macOS, and Linux Kali): The installation process is straightforward and similar to most desktop applications.
- Download the Installer: Choose the installer relevant to your OS (e.g.,
ZAP_2.16.0_windows.exefor Windows,ZAP_2.16.0.dmgfor macOS, or the appropriate Linux package). - Run the Installer:
- Windows: Double-click the
.exefile. Follow the on-screen prompts, accepting the license agreement, choosing an installation directory, and selecting components (the default options are usually fine). - macOS: Open the
.dmgfile and drag the ZAP application icon into your Applications folder. - Linux (Kali Linux Example): ZAP is often pre-installed or easily installable on penetration testing distributions like Kali Linux.
- If pre-installed: You can typically find it in the “Web Application Analysis” or “Vulnerability Analysis” section of your applications menu.
- If not pre-installed or for updates: You can install it via the package manager. Open a terminal and run:
sudo apt update && sudo apt install zaproxyAlternatively, you can download the.tar.gzfile from the ZAP website, extract it, and run thezap.shscript.
- Windows: Double-click the
C. First Launch & Welcome Screen: When you launch ZAP for the first time, you’ll be greeted by a “Persist Session” dialog.
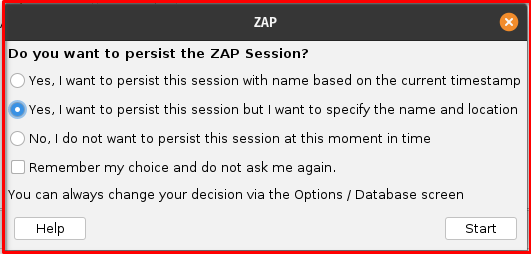
- Persist the ZAP session?
- “Yes, persist this session”: This option saves your work, including the sites you’ve scanned, alerts found, and any modifications you’ve made. You’ll be prompted to choose a location to save the session file. This is recommended for longer testing sessions or if you want to resume work later.
- “No, I do not want to persist this session at this moment”: This creates a temporary session that will be discarded when you close ZAP. This is useful for quick, ad-hoc scans.
After making your choice, ZAP’s main user interface will appear. The UI is typically divided into several key areas:

- Workspaces (Left Pane): Shows the “Sites” tree (your target applications) and “History” (all requests and responses).
- Editor (Middle Pane): Displays details of selected requests, responses, alerts, and other information.
- Output/Information (Bottom Pane): Contains various tabs like “Alerts,” “Output,” “Active Scan,” “Spider,” etc., providing real-time feedback and results.
Core Concepts of OWASP ZAP
To effectively use ZAP, it’s crucial to understand its fundamental components and how they interact.
A. Proxying: At its heart, ZAP functions as an intercepting proxy. This means it sits between your web browser (or any client) and the web application you’re testing. When you configure your browser to use ZAP as its proxy, all your HTTP/S traffic flows through ZAP.
- Man-in-the-Middle: ZAP acts as a “man-in-the-middle,” allowing it to see, intercept, and even modify every request sent from your browser and every response received from the server.
- Crucial for Traffic Analysis: This proxying capability is fundamental because it enables ZAP to build a comprehensive map of the application (the “Sitemap”), identify potentially interesting requests, and then launch various attacks based on the observed traffic.
- Browser Configuration: You’ll typically need to configure your browser’s proxy settings (e.g., in Firefox, Chrome, or system-wide settings) to point to ZAP’s default proxy address (usually
localhost:8080). ZAP also provides an easy way to launch browsers pre-configured with its proxy.
B. Spiders (Crawlers): Once ZAP is proxying your traffic, spiders come into play to discover the application’s structure.
- Purpose: Spiders are automated tools within ZAP that systematically crawl a target web application to identify all accessible URLs, forms, and other resources. They essentially “walk” through the application, following links and submitting forms to build a comprehensive sitemap.
- Types of Spiders:
- Traditional Spider: This is the default and faster spider. It parses HTML and JavaScript to find links and forms. It’s effective for traditional, server-rendered web applications.
- AJAX Spider: Designed for modern, highly dynamic web applications that rely heavily on JavaScript and AJAX calls to load content. The AJAX Spider uses a browser engine (like Chrome Headless) to render pages and trigger JavaScript events, allowing it to discover content that the traditional spider might miss. Use this when your application has a lot of client-side rendering or dynamic content.
C. Scanners: After ZAP has mapped out the application, it uses scanners to actively look for vulnerabilities.
- Active Scan:
- What it does: An active scan is an attack-oriented process where ZAP sends various malicious payloads and requests to the target application to try and exploit known vulnerabilities. It actively probes the application for weaknesses like SQL Injection, Cross-Site Scripting (XSS), Command Injection, and more.
- Caution: Active scans can be intrusive and may potentially alter data, trigger alerts on the server, or even cause denial-of-service conditions if not used carefully. Therefore, it is paramount that you only perform active scans on applications you have explicit permission to test, ideally in a dedicated testing or development environment. Never run an active scan on a production system without proper authorization and understanding of the potential impact.
- Passive Scan:
- What it does: Unlike active scans, passive scans are non-intrusive. ZAP passively analyzes all the requests and responses that pass through its proxy without sending any additional requests to the server. It inspects headers, content, and common patterns to identify potential vulnerabilities or misconfigurations.
- Benefits: Passive scanning is excellent for continuous monitoring during manual exploration or automated functional testing. It won’t impact the application’s performance or data, making it safe to use in almost any environment. It can detect issues like missing security headers, insecure cookies, and information disclosure.
D. Alerts & Reports: Once ZAP identifies potential vulnerabilities, it presents them as “Alerts.”
- How ZAP Presents Alerts: The “Alerts” tab in ZAP’s bottom pane is where all discovered vulnerabilities are listed. Each alert provides details about the vulnerability, including its name, the URL where it was found, the affected parameter, and often a description, solution, and references to external resources (like OWASP Top 10).
- Importance of Understanding Alert Levels: Alerts are categorized by risk level:
- High: Critical vulnerabilities that could lead to significant impact (e.g., full system compromise, data theft).
- Medium: Significant vulnerabilities that could still lead to considerable impact.
- Low: Minor vulnerabilities or misconfigurations that might be part of a larger attack chain.
- Informational: Non-vulnerability findings that provide useful context or indicate potential areas for improvement (e.g., missing security headers). Understanding these levels helps you prioritize your remediation efforts.
Final Thoughts
The landscape of web security is constantly evolving, and so too must our tools and knowledge. OWASP ZAP is a powerful, versatile, and community-driven solution that puts robust security testing capabilities directly into your hands. By embracing tools like ZAP and committing to continuous learning, you’re not just building applications; you’re building a more secure web for everyone. Keep exploring, keep learning, and keep securing!
Up Next: Deep Dives and Demos!
This blog post has provided a solid foundation, but the world of OWASP ZAP is vast and full of advanced capabilities. Stay tuned for our upcoming blog posts where we’ll delve deeper into specific aspects of ZAP, including:
- Practical Demos: Step-by-step guides on performing various types of scans and utilizing ZAP’s features on real (safe!) web applications.