Introduction
Creating a bootable USB drive is often the first step toward installing or testing a Linux distribution. Whether you’re setting up a new system, repairing an existing one, or simply exploring different distros, having a reliable installer on a USB stick is essential. While many users gravitate toward graphical tools like Balena Etcher or Rufus, those working within a Linux environment often prefer more direct and flexible solutions.
In this post, we’ll focus on the powerful yet risky dd command-line utility, which offers precise control over the creation of bootable USB drives. If you’re comfortable with the terminal, dd can be a fast and efficient way to write ISO files to USB—just be careful, as a small mistake can wipe the wrong drive.
How to create a USB Installer
WARNING: The dd command is extremely powerful and can permanently erase data if used incorrectly. Double-check your target device (of=/dev/sdX) carefully before executing the command.
Steps 1: Download the Linux Distribution’s ISO File:
Make sure you have the .iso file for the Linux distribution you want to install.
Steps 2: Identify Your USB Drive:
Plug in your USB drive. Open a terminal and use one of the following commands to identify its device name. You’re looking for something like /dev/sdb, /dev/sdc, etc., not a partition like /dev/sdb1.
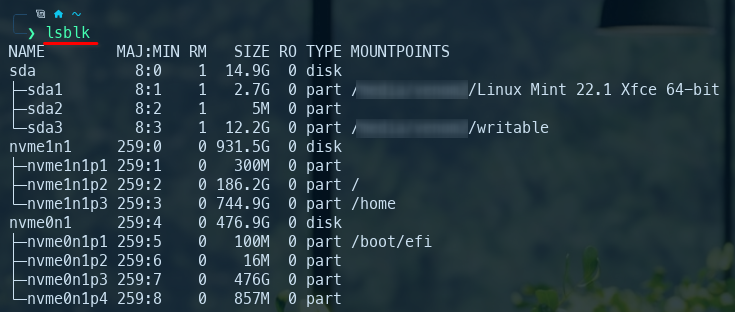
lsblk(most commonly recommended and easiest to read)- Look for your USB drive by its size. For example, if your USB is 16GB, you’ll see a device with a size close to that.
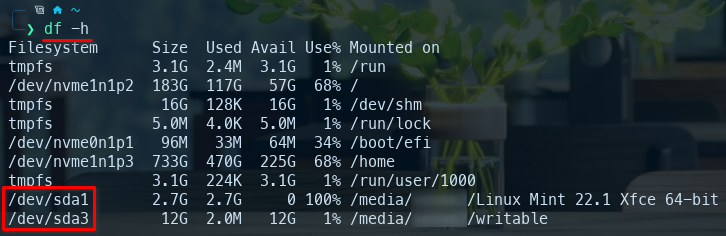
df -h(disk free with parameter -h in human readable)- This shows mounted file systems. You might see your USB drive mounted at a path like
/media/username/USB_NAME. Note the/dev/sdXpart associated with it.
- This shows mounted file systems. You might see your USB drive mounted at a path like
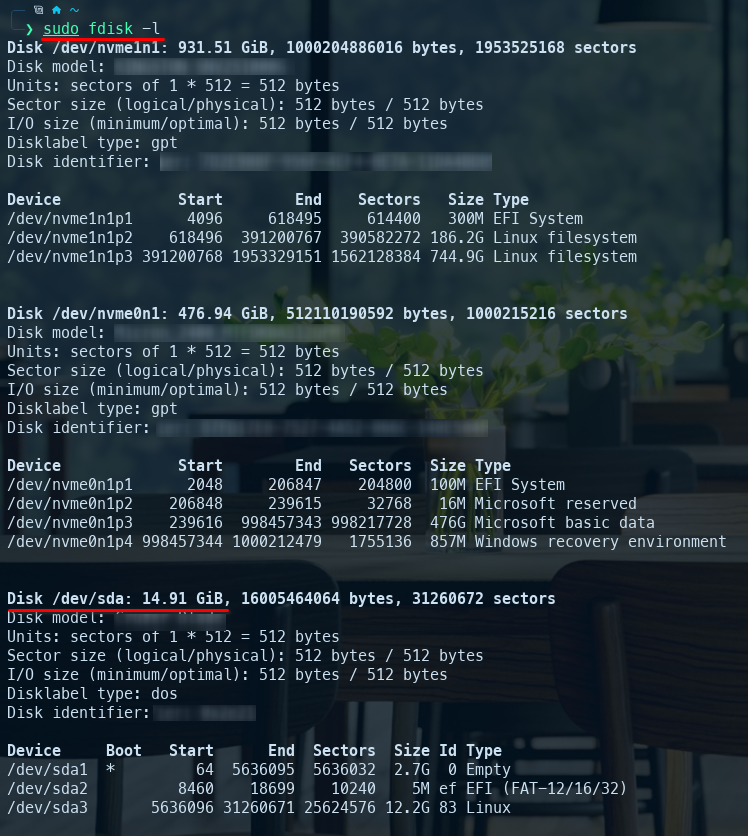
sudo fdisk -l- This lists all disk partitions. Be careful to identify your USB drive correctly
Step 3: Unmount the USB Drive (If Mounted):
If your Linux distribution automatically mounts the USB drive, you must unmount it before using dd. If your USB drive was identified as /dev/sda and has a partition /dev/sda1, you would unmount it with:
sudo umount /dev/sda1If there are multiple partitions (e.g., /dev/sdb1, /dev/sdb2), unmount all of them.
Step 4: Write the ISO Image to the USB Drive using dd:
sudo dd if=/path/to/your/distro.iso of=/dev/sdX bs=4M status=progress && sync- Let’s break down this command:
sudo: Executes the command with superuser privileges (necessary for writing to a raw disk device).dd: The disk dump utility.if=/path/to/your/distro.iso:ifstands for “input file.” Replace/path/to/your/distro.isowith the actual path to your downloaded Linux ISO file (e.g.,~/Downloads/ubuntu-24.04-desktop-amd64.iso).of=/dev/sdX:ofstands for “output file.” This is the crucial part! Replace/dev/sdXwith the actual device name of your USB drive that you identified in step 2 (e.g.,/dev/sdb,/dev/sdc). Do NOT include a partition number (e.g., /dev/sdb1). You want to write to the entire disk.bs=4M:bsstands for “block size.” This specifies the size of each block thatddwill read and write.4M(4 megabytes) is a common and usually efficient block size for this operation.status=progress: This option (available in newer versions ofdd) shows the progress of the writing process, which is very helpful asddcan otherwise appear to be frozen.&&: This is a shell operator that executes thesynccommand after theddcommand successfully completes.sync: This command forces all buffered data to be written to disk, ensuring that the entire ISO is written to the USB drive before you remove it.
Example:
If your ISO is named pop-os_22.04_amd64_intel_53.iso and is in your Downloads folder, and your USB drive is /dev/sda, the command would be:

Once the command finishes (you’ll see the command prompt return), your USB installer is ready. You can then safely remove the USB drive.
Final Thoughts
While dd may lack the visual reassurance of GUI-based tools, it makes up for it in speed, scripting potential, and universal compatibility across Unix-like systems. Once you understand the risks and double-check your commands, dd becomes a reliable ally in your Linux toolkit. Always verify your target device and consider using sync or pv to improve the safety and visibility of the process.
Whether you’re a seasoned Linux user or just beginning to explore command-line power, mastering tools like dd helps deepen your understanding of how Linux interacts with hardware—and gives you more control over your system setup.